This page provides a detailed walkthrough of Worship Hall, covering puzzles, optional routes, obtainable items, triggered events, and boss strategies with images to help you progress smoothly.
Use this guide to assist you throughout your playthrough.
| ←PREV Middle School | NEXT→ Sugisato |
East Side of the Worship Hall
You can begin your exploration from the West Hall as well.
| Things to Know | |
| [You Can Permanently Erase Enemies] As a special gimmick in the East area, enemies you defeat in the blue lantern room will be permanently erased. Conversely, enemies defeated anywhere other than under a blue lantern will respawn after some time. This familiar rule is the same as always for the Dark Shrine stage and also applies in the West Floor and beyond the large door. If you use this gimmick to erase 8 enemies, you will unlock an Achievement. | |
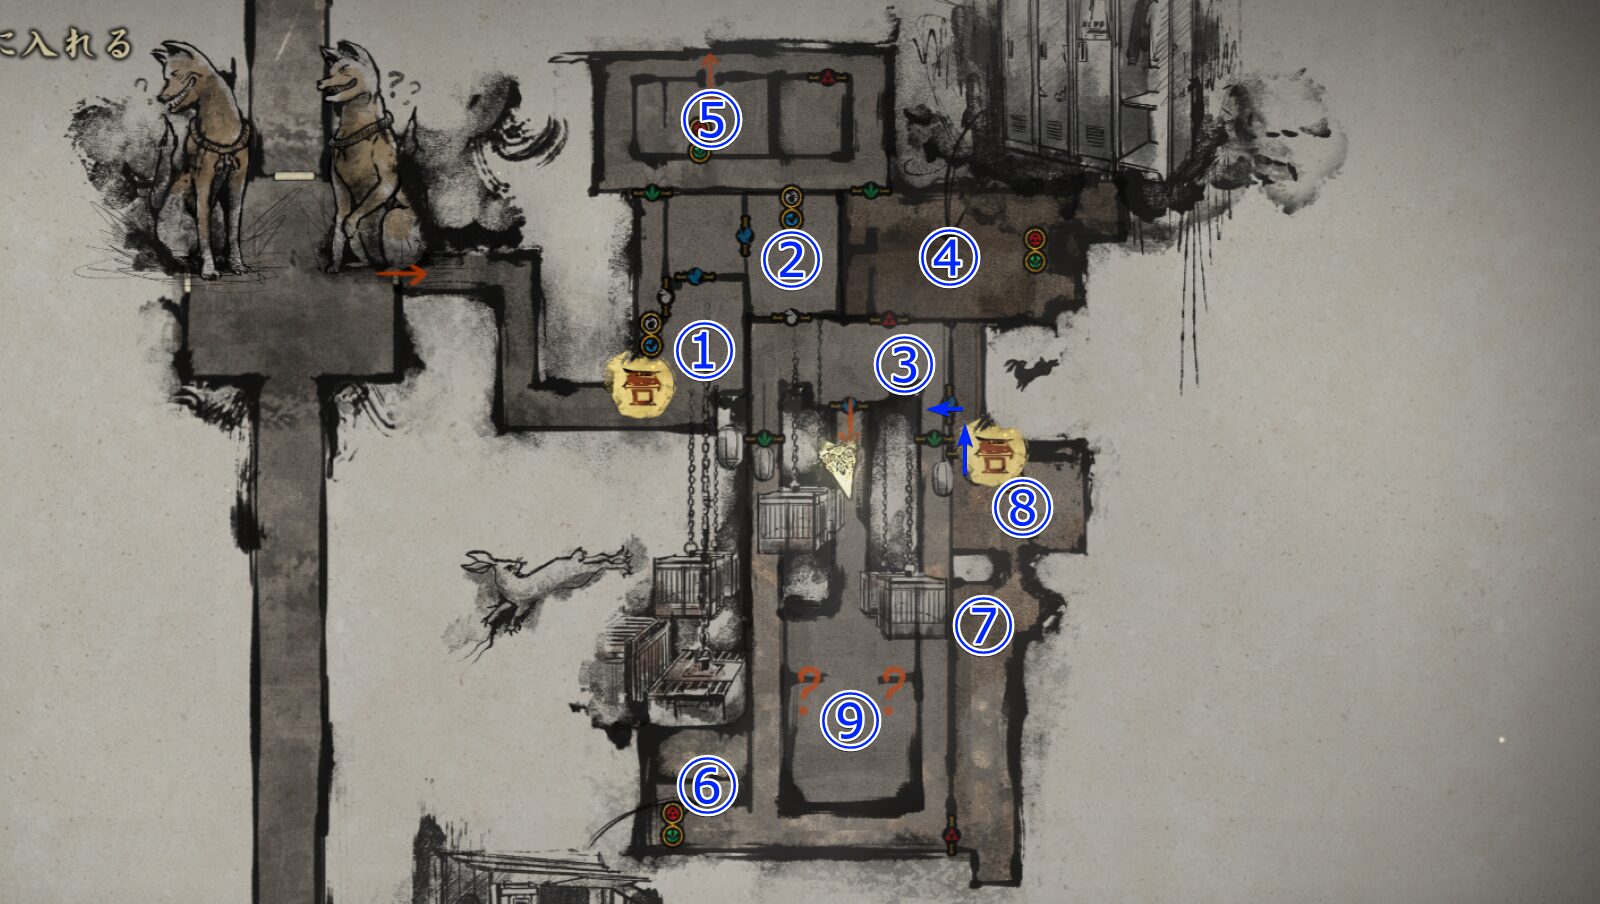 ┗Once you reach the large door, examine the fox statue on the right to move to room ①. Use the Hokora there to save your game. Nearby you can pick up Yokan、and a Journal Entry. Change the fox statue switch from white to blue to open the path. ┗In room ②, pick up the Divine Water and change the fox statue switch from blue to white. If there is an enemy in ③, lure it into room ② and defeat it there. A different enemy appears in room ④, so that route is not recommended. ┗Proceed to room ④, defeat the enemy, and pick up the Higashi and Bandage. Change the fox statue switch from red to green. An enemy will barge in, so defeat it as well. ┗In room ⑤, defeat the enemy in the narrow space. There is a First Aid Kit and a Journal Entry here. If you change the fox statue switch from green to red, the door to the next room will open, so once you see the enemy step out into the corridor, change the same fox statue switch from red back to green. Lure that enemy into room ④ and defeat it there. ┗Go through the open green door to return to room ① and change the fox statue switch from white to blue. In room ②, change the fox statue switch from blue to white. This will open up the route to ⑥. ┗At the makeshift chicken coop in ⑥, pick up a Journal Entry and Bandage, and before you know it an enemy will be waiting outside—defeat it. Change the fox statue switch from green to red, then head to ⑧. ┗There is Kudzu Tea in ⑦. In ⑧, you will find a Journal Entry and a Hokora, so save your game and change the fox statue switch from white to blue. It is hard to see on the map image, but the blue arrow shows the way back to the central hall. ┗Proceed to ⑨ and take on the Puzzle [Light]. Solving it lets you obtain two lanterns from inside the cage; place them on the lights on both sides of the altar where Sakuko is and then take the White Rabbit Emblem Key. ┗Before returning to the main hall, the back of the locker room in ④ will open; there you can obtain the Omamori【Bull】. |
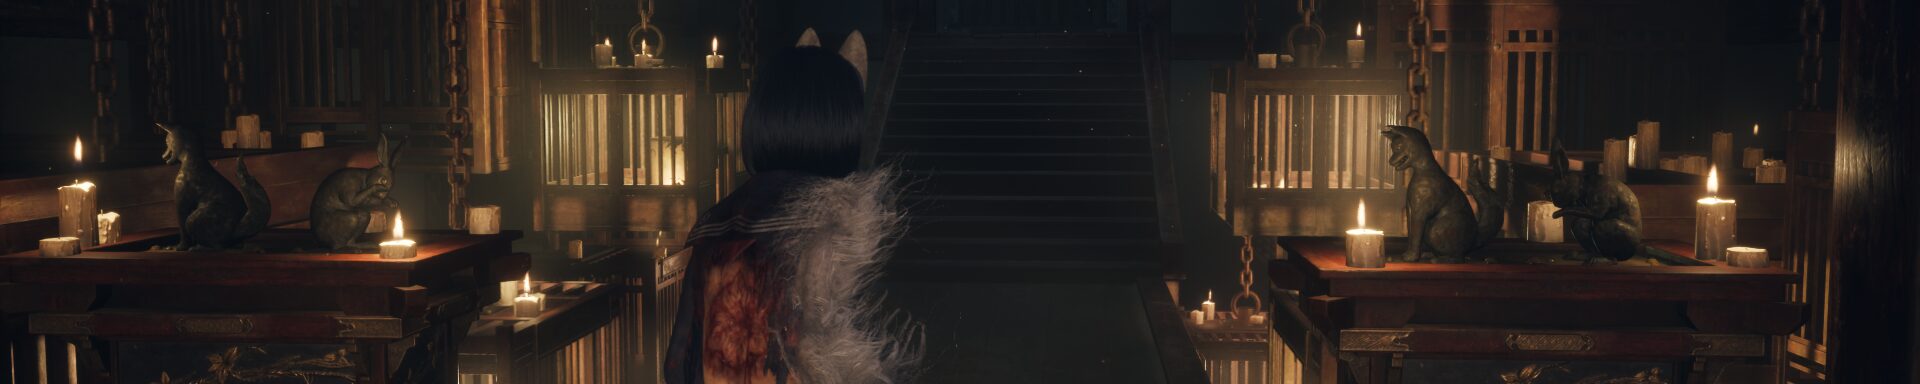
Puzzle【Light】
This puzzle involves moving the dog and rabbit statues placed on two platforms to align the cages hanging by chains at both ends of the path.
However, you must not only make them parallel—adjust them so they are positioned just barely above the height of the path.
On both platforms, aligning the dog and rabbit so they face each other made the cages parallel.
Just as the clue suggested.
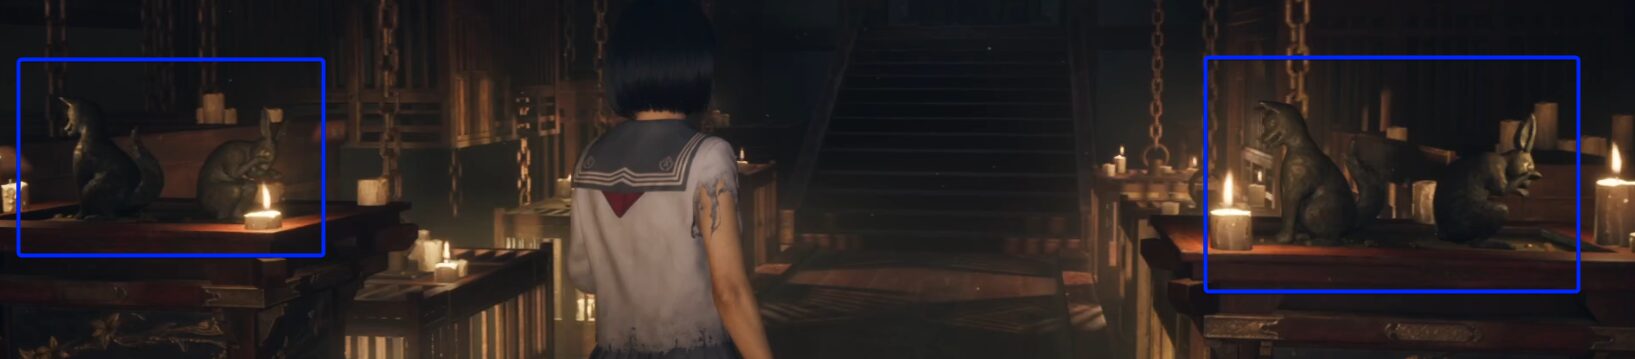
On both platforms, placing the dog and rabbit back-to-back made the cages parallel.
I fiddled with it randomly and it worked.
If the cages don’t open, try adjusting the statues a bit more until they end up facing the same direction.
West Side of the Worship Hall
There is no blue lantern room here to permanently erase enemies, so explore while dealing with foes that will eventually respawn.
 ┗①Start by saving here. First, change the fox statue switch from white to green and head to ②. ┗In ②, you’ll find a Journal Entry and some Yokan. Inspect the light to completely change the mood of the room. Examine the three dolls and you’ll discover the Rightward-Facing Fox Crest. ┗Next, head to ③, pick up the Inari Sushi and Bandage, then change the fox statue switch from green to white. Circle around to ④ to find a Dried Carcass. ┗In the classroom at ⑤, pick up the Divine Water and a Journal Entry, then inspect the light on the teacher’s podium. Touch the desk to trigger a battle. Once it’s over, examine the desk again to obtain the Forward-Facing Fox Crest. ┗Return to ①, change the fox statue switch from red to blue, and head to ⑥. In ⑥, pick up the Higashi, Kudzu Tea, and a Journal Entry, then inspect the light. An enemy will rush you at close range here, so stay alert. After defeating it, examine the three spots with snacks in the room to obtain the Leftward-Facing Fox Crest. ┗Return to ① and insert all three crests to obtain the Tri Scale Emblem Key, then go back to the large door and unlock it. ┗You can’t seem to open the Inari-sama Door at ⑦, so just ignore it for now. |
Puzzle【Memories】
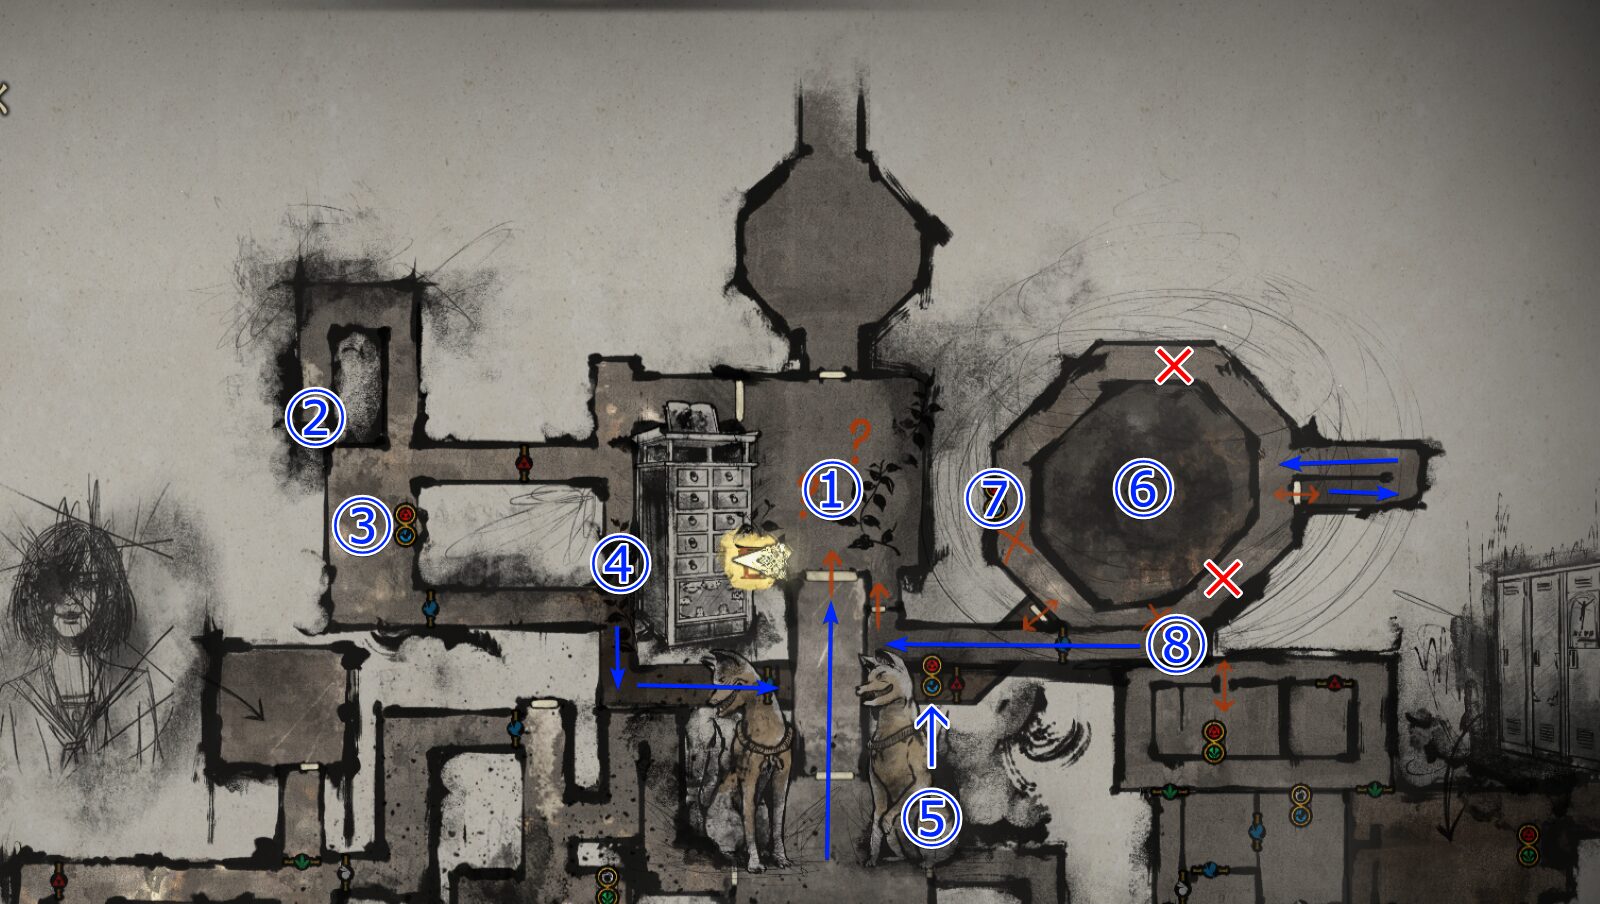 ┗Save your game at ① using the Hokora. If you’re playing on [Hard], you’ll find ② contains Drawing of a Young Shimizu Hinako. ┗At ③, pick up some Kudzu Tea and change the fox statue switch from red to blue. In ④, you’ll find Divine Water and a Ema. ┗At ⑤, change the fox statue switch from blue to red to proceed. It’s hard to see, but there’s Yokan on the shelf. ┗At ⑥, you’ll trigger the Boss Battle [Tumor Woman]. Details are explained later.If you’re on [Lost in Fog] difficulty, the Raygun is dropped along the outer ring of the lower floor of this room. ┗After breaking through, climb the stairs and quickly destroy the cocoons located at the ✕ markers on both sides of the circular second floor. Enemies will spawn later anyway, but it’s safer to take them down while they’re powerless. ┗At ⑦, grab the Brainiac Hero Comic, then change the fox statue switch from red to blue and pass through ⑧ to return to ①. ┗Once you arrange Shu’s treasures, the cutscene will begin. |
Boss Strategy: Tumor Woman
※For clarity, this guide applies unofficial labels to bosses whose official names have not been disclosed. These names are used solely for reference purposes.
Its movements are slow, and its attacks are not particularly overwhelming. However, things get troublesome once the small enemies spawned from its cocoons join the fight, so make sure to take down the cocoons before they hatch.
After that, simply wait for openings and chip away with light naginata attacks to wear it down and win.
Even on [Hard], this battle is surprisingly easy. The [Priestess] fight is actually tougher.
Attack Patterns
① Vomit Spray
Blood spurting from its face is the signal. You’ll get used to it quickly and be able to dodge it with ease.
② Double Charge
It covers a fairly long distance in a straight line, so evade to the side. Occasionally, an effect appears indicating a counter opportunity—don’t miss it.
③ Minion Summon
Once it produces a cocoon, destroying it becomes your top priority.
The minions actually deal more damage than the Tumor Woman herself, and fighting a 1-vs-2 can get overwhelming fast.
④ Roar
If you keep attacking recklessly, it will unleash a roar that deals area-of-effect damage.
If you feel you’ve gotten too close, keeping some distance is a valid way to manage the risk.
| ←PREV Middle School |
Related Guides
Here are my other SILENT HILL f guides. Feel free to check out anything that catches your eye.