This page provides a detailed walkthrough of Middle School, covering puzzles, optional routes, obtainable items, triggered events, and boss strategies with images to help you progress smoothly.
Use this guide to assist you throughout your playthrough.
| ←PREV Ebisugaoka - Second Visit | NEXT→ Worship Hall |
First Half of the Middle School Walkthrough
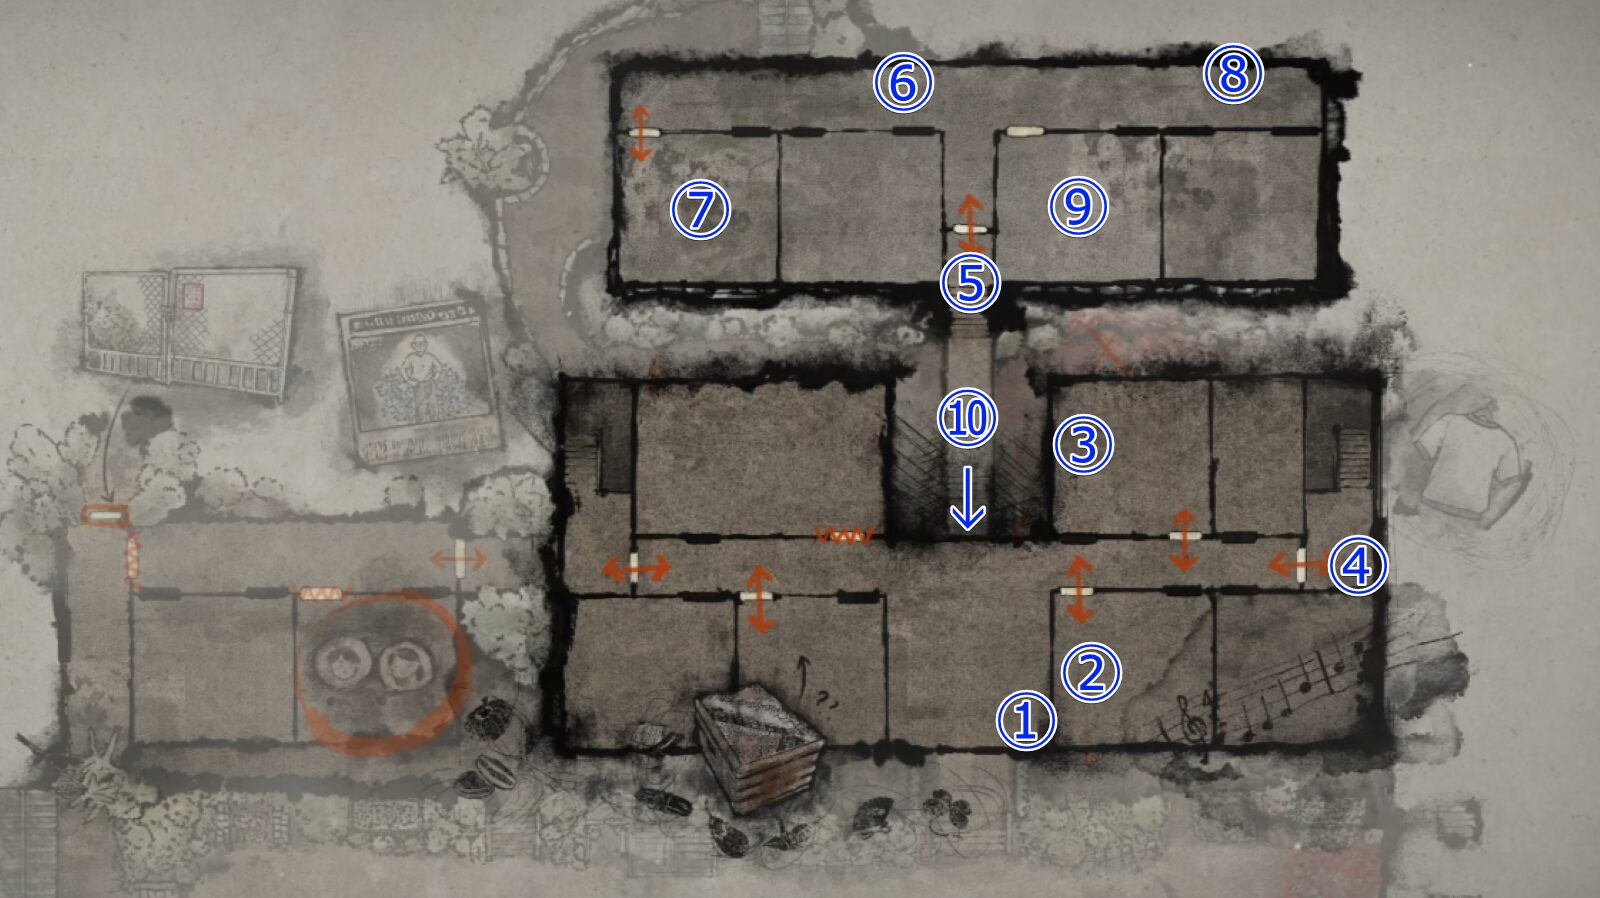
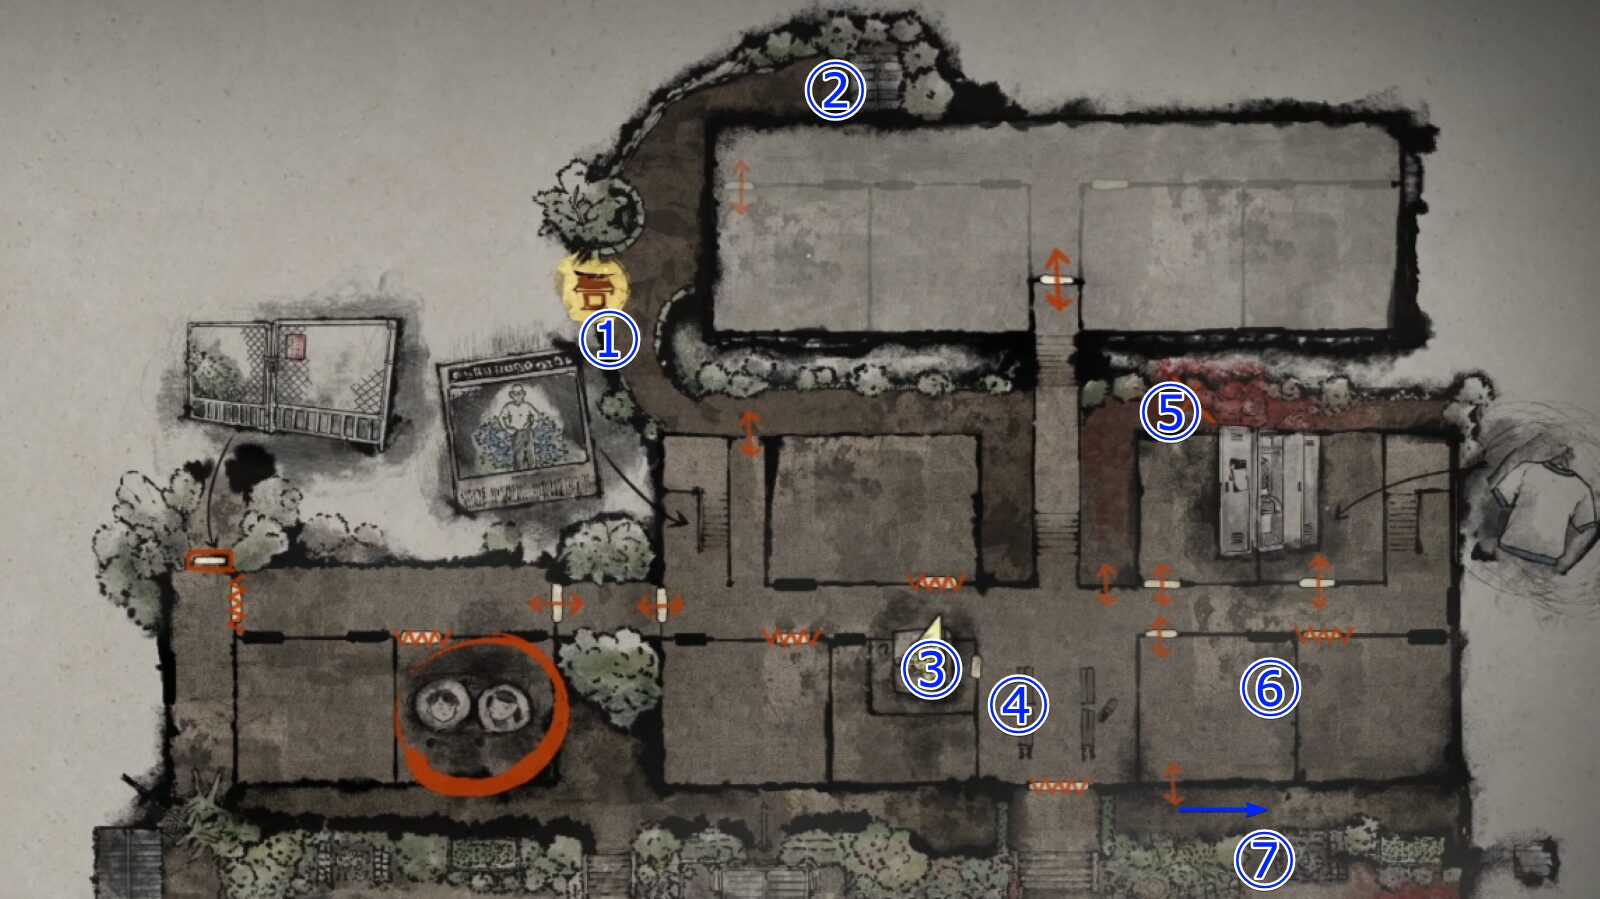 ┗① contains a Hokora and the first Origami of Rumors. ② has a Dried Carcass. ┗Investigate the Staff Room at ③. There is an Steel Pipe behind you. ④ contains Yokan. ⑤ holds Divine Water. ┗Inside the classroom at ⑥, pick up Ramune. Exit through the classroom window toward ⑦. | |
 ┗After exiting through the window, your destination changes depending on your selected puzzle difficulty. ┗[Story] leads you to the Blue Area A chicken coop where you can obtain a Hairpin and the Origami of Rumors #2. ┗[Hard] takes you to the Red Area B hydrangea field, where you can obtain the Main Building 2F Stair Key. The second Origami of Rumors is still located in the chicken coop at Blue Area A. ┗[L.Fog] allows you to pick up the Main Building 2F Stair Key in front of the planter at Purple Area C. ┗① contains Arare. ② has a Dried Carcass. ③ holds the Weapon [Sledgehammer]. ┗Return inside the classroom through the window at ④. | |
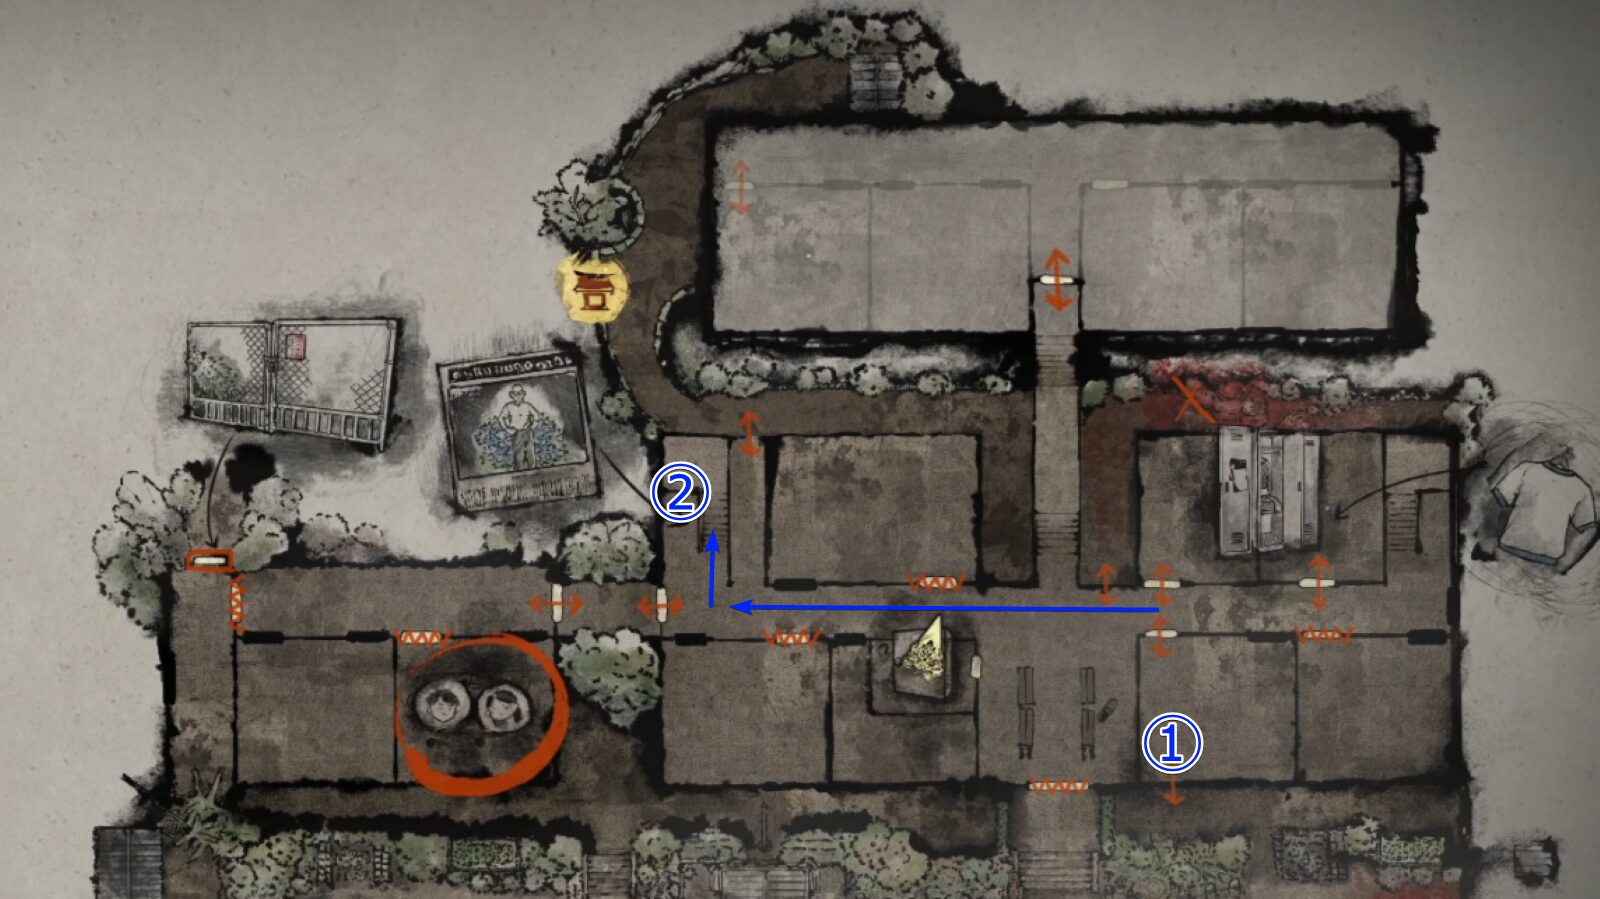 ┗Once back at ①, use the Hairpin in the Staff Room to obtain the Main Building 2F Stair Key. Head upstairs toward ②. ┗If you're on the [Hard] or [L.Fog], you can go straight to the 2nd floor. ┗You could take the opposite staircase, but ② is recommended as there's a Hokora along the way and the classroom where the Puzzle [Secret Box] begins is nearby. | |
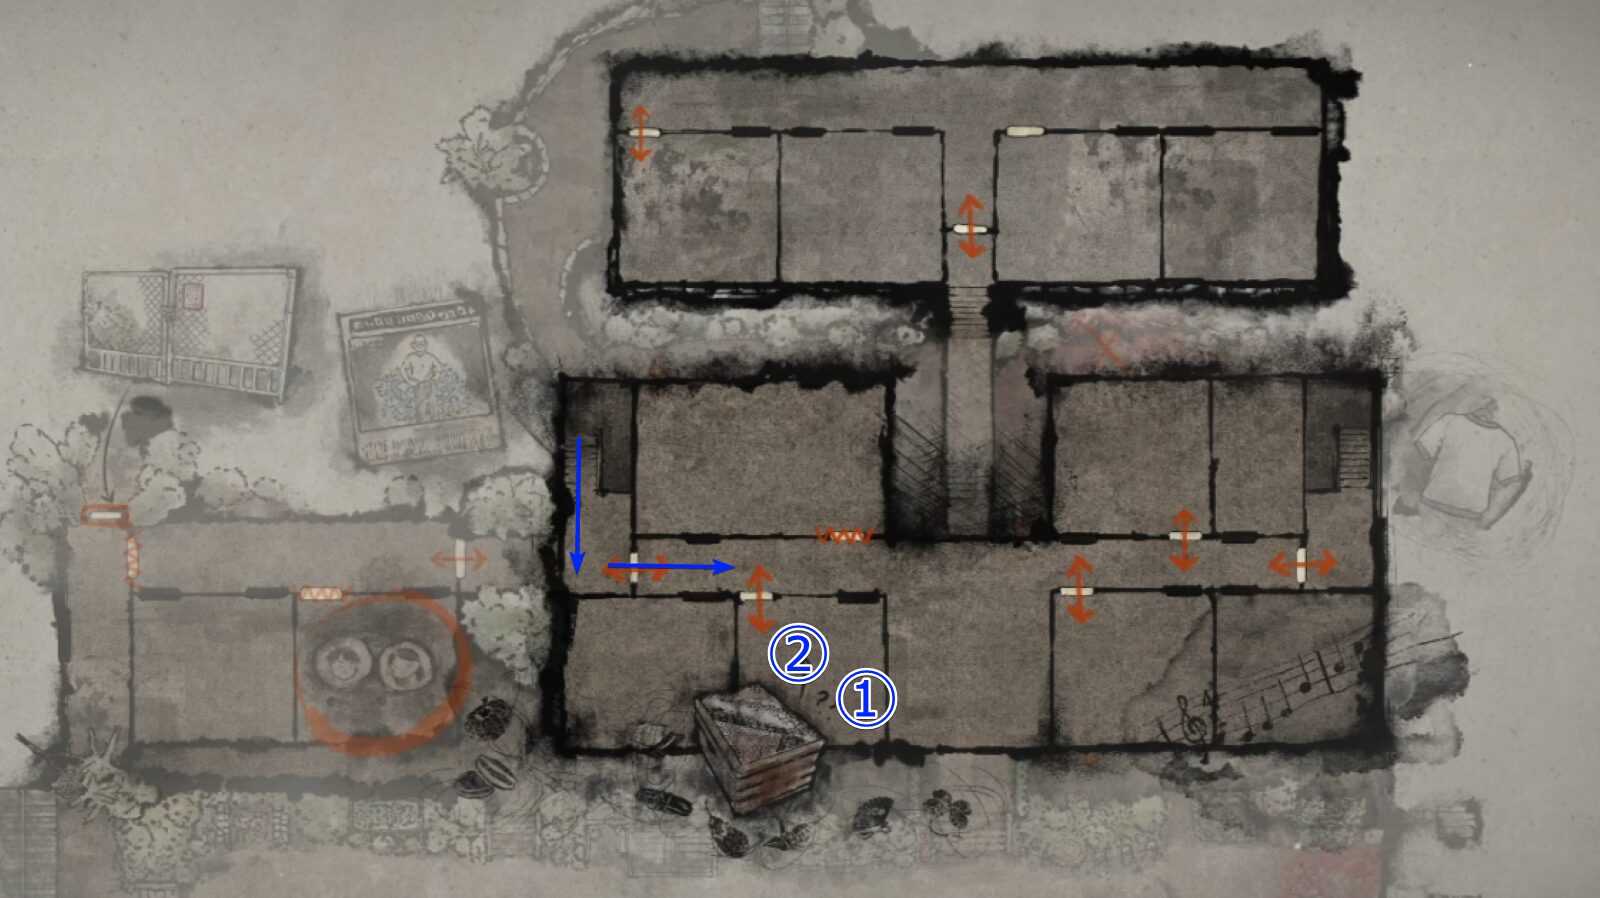 ┗Upon reaching the 2nd floor, immediately enter the classroom on your left. ┗① contains the third Origami of Rumors #3. Picking up the Unopened Envelope on Rinko’s desk at ② will trigger the Puzzle. |
Puzzle【Secret Box】
Slide the highlighted parts on the front and back surfaces of the Secret Box to reveal the hidden patterns.
Match the patterns according to the prompt and press confirm. If correct, you'll move on to the next prompt. There are three in total.
Puzzle 1
The drawings on the envelope serve as your clue.
Since it heavily emphasizes the tart sweetness of fruit, expose every pattern that fits that theme.
Reveal the cherry and strawberry patterns, then confirm.
Puzzle 2
The hint mentions diaries stacking up one by one, so line up the book-like patterns.
Expose three book patterns, then confirm.
Puzzle 3
The hint points to cherry blossoms in full bloom.
 ← Expose only this pattern, then confirm.
Puzzle 1
The drawings on the envelope are your clue here as well.
Since it emphasizes fruit, expose every fruit-related pattern.
![Secret Box Puzzle [Hard] 1-1](https://yori-room.com/wp-content/uploads/2025/12/MhZSpFHqds.jpg)
![Secret Box Puzzle [Hard] 1-2](https://yori-room.com/wp-content/uploads/2025/12/bjvSGoWJML.jpg)
Puzzle 2
Again, the clue talks about diaries stacking up, so arrange the book-like patterns.
![Secret Box Puzzle [Hard] 2-1](https://yori-room.com/wp-content/uploads/2025/12/YeAZavtYOG.jpg)
![Secret Box Puzzle [Hard] 2-2](https://yori-room.com/wp-content/uploads/2025/12/BgibcIPKMc.jpg)
Puzzle 3
The phrase about cherry blossoms in full bloom really stands out here.
![Secret Box Puzzle [Hard] 3-1](https://yori-room.com/wp-content/uploads/2025/12/XBfFtdlS78.jpg)
![Secret Box Puzzle [Hard] 3-2](https://yori-room.com/wp-content/uploads/2025/12/FZReaZSb91.jpg)
The prompts themselves don't change at all. Only the number of movable segments increases, so this version is actually quite simple.
Solving this correctly makes the Secret Box spit out the Second Floor Classroom Generic Key. Why was it even in there…?
After the event, you’ll be able to leave the classroom and resume exploring the second floor.
Second Half of the Middle School Walkthrough
 ┗①has an Antique Comb and a Tool Kit. On the teacher’s podium at ②, you’ll find the Old Annex Main Gate Key, so be sure to pick it up. ┗At ③, you can get Arare and Origami of Grievances #1. It’s a clue for Puzzle [Locker], so don’t miss it. ┗④also has Arare. Go downstairs and head to the old school building at ⑤. ┗At ⑥ you’ll find Arare and a Note between Lovers. This is another clue for Puzzle [Lockers]. ┗Inside the classroom at ⑦, there’s Chocolate and several items related to Puzzle [Locker]: Origami of Grievances #2, the Locker Room Key, a Coded Memo [Story], and Asakura’s Textbook, all of which serve as clues. ┗At ⑧, you’ll find a Note from a Male Student [Hard]. Inside the classroom at ⑨, there’s another Tool Kit, a Note from a Male Student #2 [Hard], and a Note between Lovers #2. All of these notes are important clues. ┗Go to ⑩ to return to the Main Building, then head for the Locker Room. |
Puzzle【Locker】
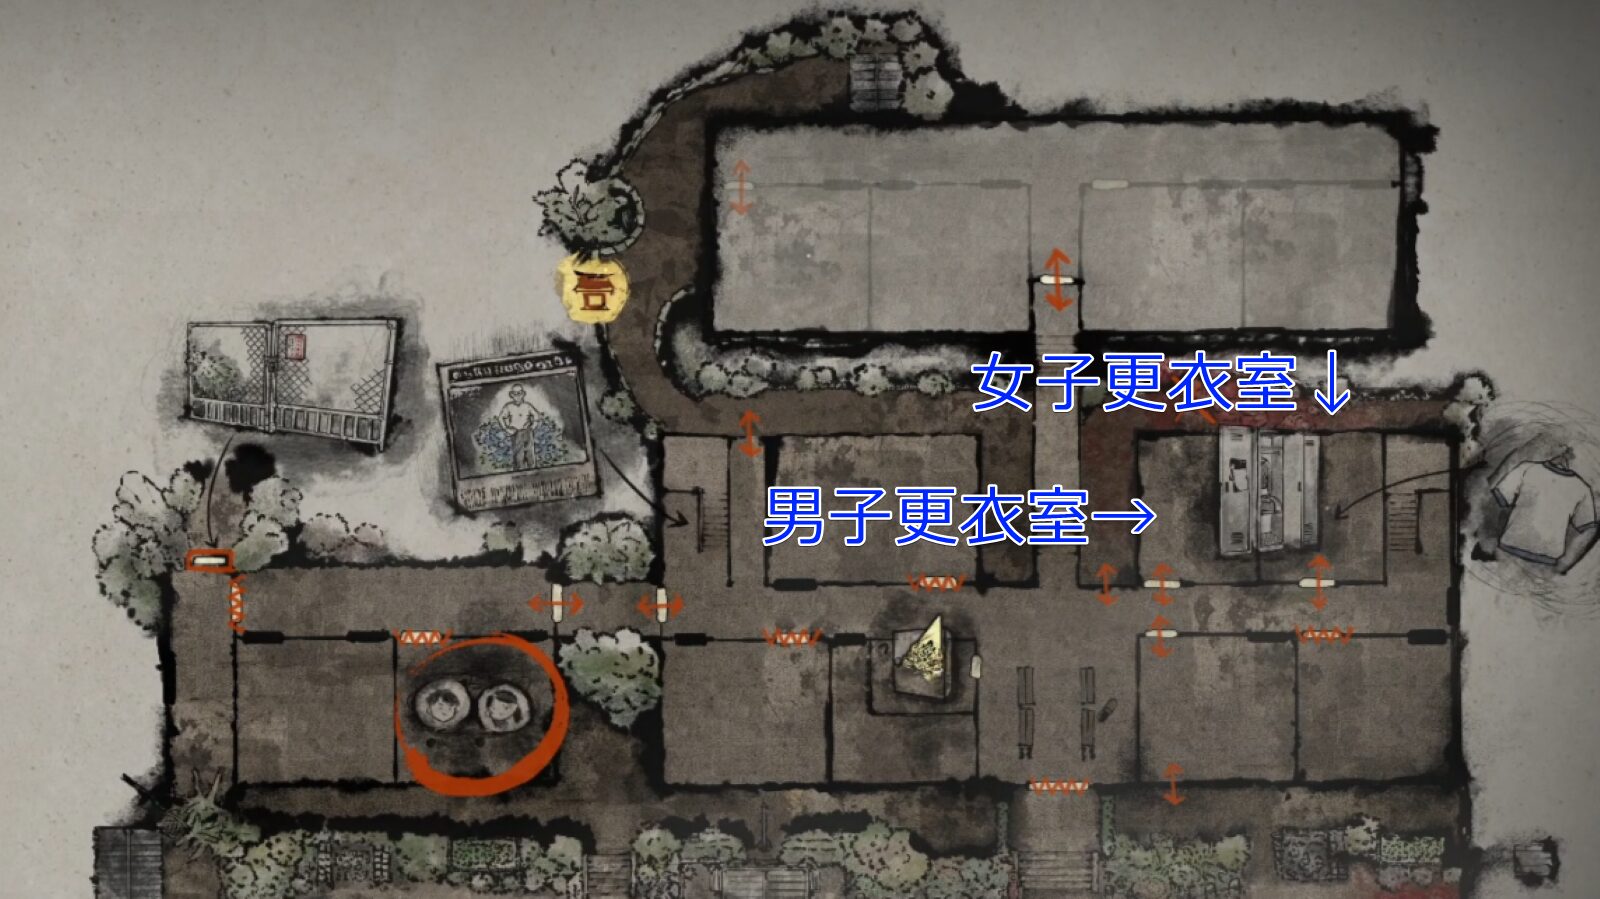
Girls' Locker Room↓
Boys' Locker Room→
The rule here is to unlock the four dial-locked lockers located in both the Boys’ and Girls’ Locker Rooms on the first floor.
It seems the students converted words related to themselves into numbers, and every memo or Origami you collected during the latter half of exploring Middle School serves as a hint for this puzzle.
You can roughly understand the conversion method by reading the Male Student’s Memo. Use the clues to identify the correct numbers and unlock the corresponding lockers.
・Tsuchiya Taiko【377】 → Obtain Omamori【Wolf】.
・Asakura Ayumi【534】 → Obtain the Key Cabinet Key.
・Aoi Takeshi【401】 → Obtain Origami of Grievances #3, which contains hints related to Suga Yoshie.
・Suga Yoshie【505】 → Obtain the School Bag, which increases your inventory capacity.
・Tsuchiya Taiko【377】 → Obtain Omamori【Wolf】.
・Asakura Ayumi【865】 → Obtain the Key Cabinet Key.
・Aoi Takeshi【401】 → Obtain Origami of Grievances #3, which contains hints related to Suga Yoshie.
・Suga Yoshie【505】 → Obtain the School Bag, which increases your inventory capacity.
・Tsuchiya Taiko【377】 → Obtain Omamori【Wolf】.
・Asakura Ayumi【399】 → Obtain the Key Cabinet Key.
・Aoi Takeshi【401】 → Obtain Origami of Grievances #3, which contains hints related to Suga Yoshie.
・Suga Yoshie【505】 → Obtain the School Bag, which increases your inventory capacity.
After Obtaining the Key Cabinet Key
Open the key box in the staff room to obtain the Key to the Back Mountains, then return to the classroom where Shu and Rinko are waiting.
| ←PREV Ebisugaoka - Second Visit | NEXT→ Worship Hall |
Related Guides
Here are my other SILENT HILL f guides. Feel free to check out anything that catches your eye.
