Here are several examples of highly effective Omamori combinations.
I also outline powerful builds that make combat far smoother, as well as situational swap-in options depending on what each encounter demands.
So use this guide to assist you throughout your playthrough.
You Can Equip Up to Five Omamori
During your first playthrough you can equip three slots. On your second playthrough this expands to four slots, and by the third playthrough you can unlock up to five slots through Hokora Prayers.
Of course, the hidden Omamori found in the field alone are not enough. Draw Omamori at the Hokora adds even more options, greatly expanding the range of possible combinations.
You can complete all 23 Draw Omamori for 20,200 Faith, and all hidden Omamori become obtainable on your second playthrough. The five-slot expansion is unlocked on the third playthrough, so this is when you can truly enjoy building fully optimized setups.
All Ema and Omamori locations are fully documented on this site.
Guide → All Omamori
Guide → All Ema
Also, you can earn a little over 20,000 Faith per playthrough. This assumes you explore every stage thoroughly and offer every single obtainable item to the Hokora without using any of them.
Our walkthrough charts include map images showing the locations of roughly 99% of all offering items. If you want to maximize your Faith gains, feel free to use them. Sorry I can’t confidently claim a full 100%.
【Rabbit】Based Counter Specialized Build
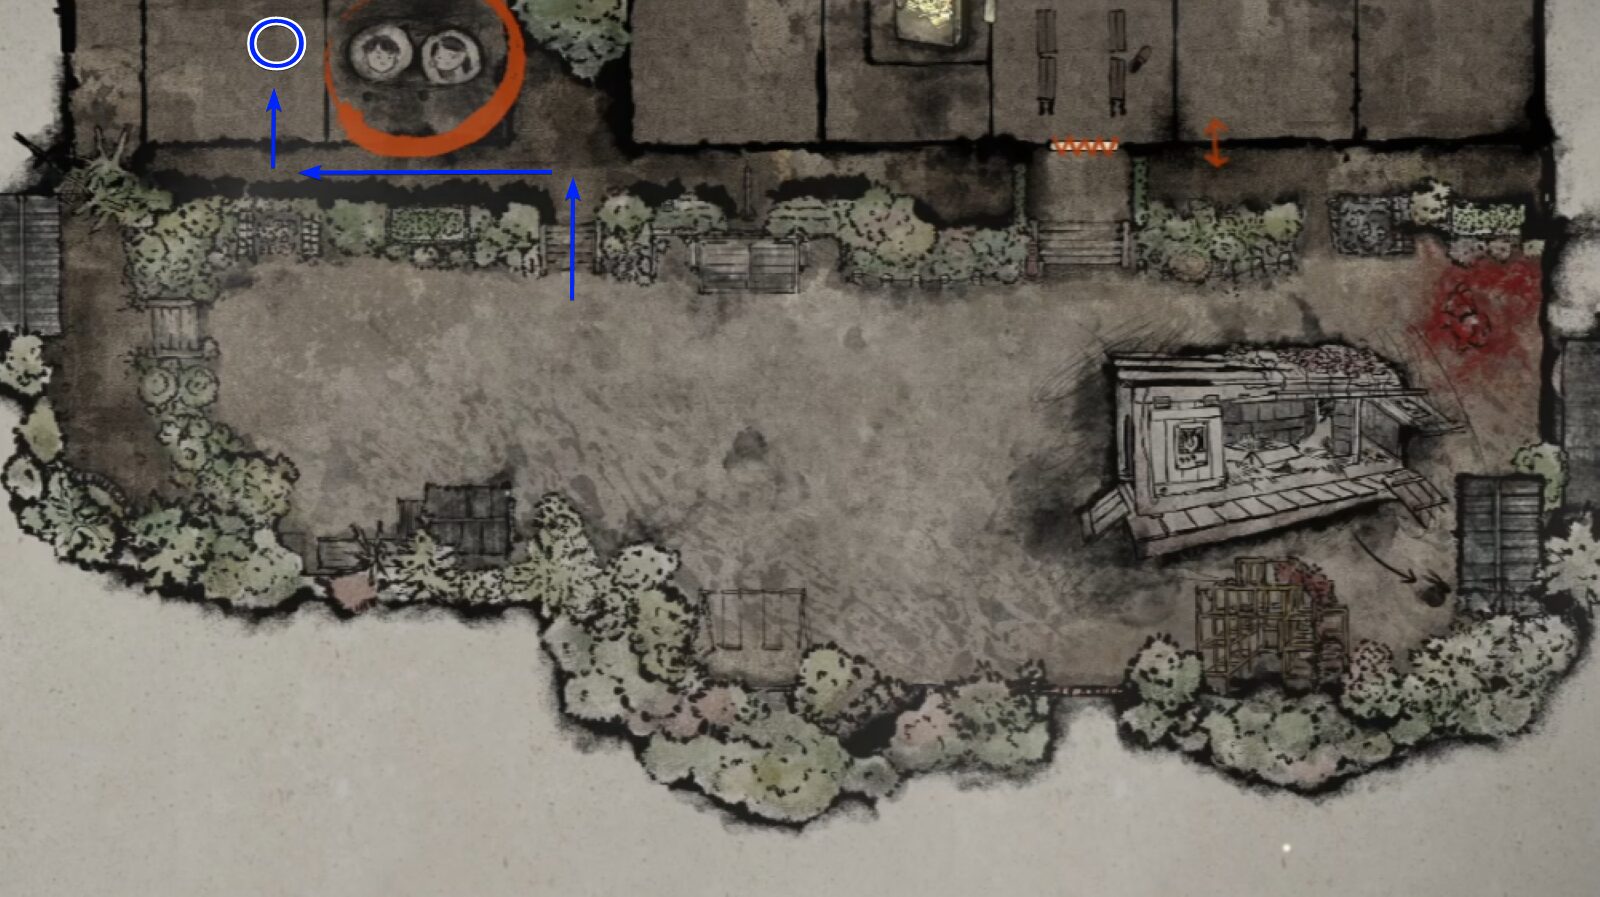
【Rabbit】Location: Middle School (New Game+)
Allows performing a Counter with a Heavy Attack during a Perfect Dodge.
Stamina drops to 0 when successful.
A build designed to consistently land Counters off Perfect Dodges
Rabbit is powerful enough to redefine the game. It excels not only against regular enemies, but also against bosses.
In fact, the playstyle changes so dramatically that it almost feels like a different game. Turning defense into offense makes it one of the strongest Omamori in the entire roster.
The prerequisite, of course, is being able to trigger Perfect Dodges consistently — so this build does demand a certain level of player skill.
General-Purpose Setup
【Rabbit】【Swordfish】【Suzuran】【Boar】【Swallow】
Rabbit’s drawback of dropping your Stamina to zero can be compensated by Swordfish and Boar, letting you follow up after a Counter or safely disengage. Swallow provides the damage buff you need on top of that. (Weasel is also a valid option.)
Suzuran increases your Perfect Dodge consistency—the very trigger Rabbit relies on. Even players who struggle with dodging should find it easier to use.
Damage-Oriented Setup
【Rabbit】【Swordfish】【Suzuran】【Weasel】【Swallow】
With Weasel added to the mix, your damage output climbs even higher.
Because enemies will no longer stagger from regular hits, you do need to play around that drawback — but once you land a Counter, the story changes. Counters will still force a stagger or interrupt reliably.
Durability-Support Setup
【Rabbit】【Swordfish】【Suzuran】【Weasel】【Crab】
By adding Crab, your weapon will not lose Durability while you are in Focus — no matter what action you take. Even if you trigger a Perfect Dodge and immediately slip into Focus during the slowdown, you will have enough time before pressing the Counter button. This prevents any Durability loss.
However, because this turns your Counters into Focus-state Counters, Swallow’s damage buff will no longer apply. Swap it out.
During reruns where you have already cleansed the grudge from the Sacred Sword and must rely on weapons like PP-8001 or the Kitchen Knife instead, Crab prevents you from burning through Tool Kits. Knives, in particular, break almost instantly without it.
【Camel】Based Focus Attack Specialized Build
【Camel】
Reduces the maximum Sanity consumed when using Focus Attack.
From Draw Omamori
A build designed to let you unleash powerful Focus Attacks repeatedly
Once the setup is ready, this build lets you initiate fights with relentless Focus Attacks — an aggressive, high-pressure playstyle.
Even though Focus Attacks consume your Maximum Sanity, spamming them will still eventually drain your limit. You will inevitably need to replenish it using offering items such as Ramune, Divine Water, or Chocolate.
I originally considered this a fun build for the third playthrough onward — once you no longer need to farm Faith — but it ended up being fairly strong, so it earns a place here.
Note that this setup is meaningless when using the Sacred Sword, as it cannot perform Focus Attacks.
General-Purpose Setup
【Camel】【Hawk】【Dolphin】【Suzuran】【Willow】
Hawk lets you hit maximum Focus almost instantly, making it a must-pick. Dolphin is also highly desirable, as it restores your maximum Sanity whenever you land a Perfect Dodge.
Suzuran shores up the consistency of your Perfect Dodges, while Willow amplifies your recovery—letting you fire off even more Focus Attacks.
This setup leans more toward boss encounters, so for regular enemy patrols, you can swap one slot for Hound to further reinforce your maximum Sanity management.
Damage-Oriented Setup
【Camel】【Hawk】【Dolphin】【Suzuran】【Weasel】
This setup adds Weasel to further amplify the already powerful Focus Attack.
It does slightly interfere with recovering your maximum Sanity, but since item usage is already part of the plan, the drawback is negligible.
“Does Weasel prevent enemies from staggering when you use a Focus Attack?” Not at all — they stagger just fine.
Durability-Support Setup
【Camel】【Hawk】【Dolphin】【Suzuran】【Crab】
By adding Crab, your weapon’s durability will not decrease while you are in Focus.
Since a Focus Attack is always executed at full Focus, the synergy here is perfect.
Bonus: What About Wolf-Based Setups?
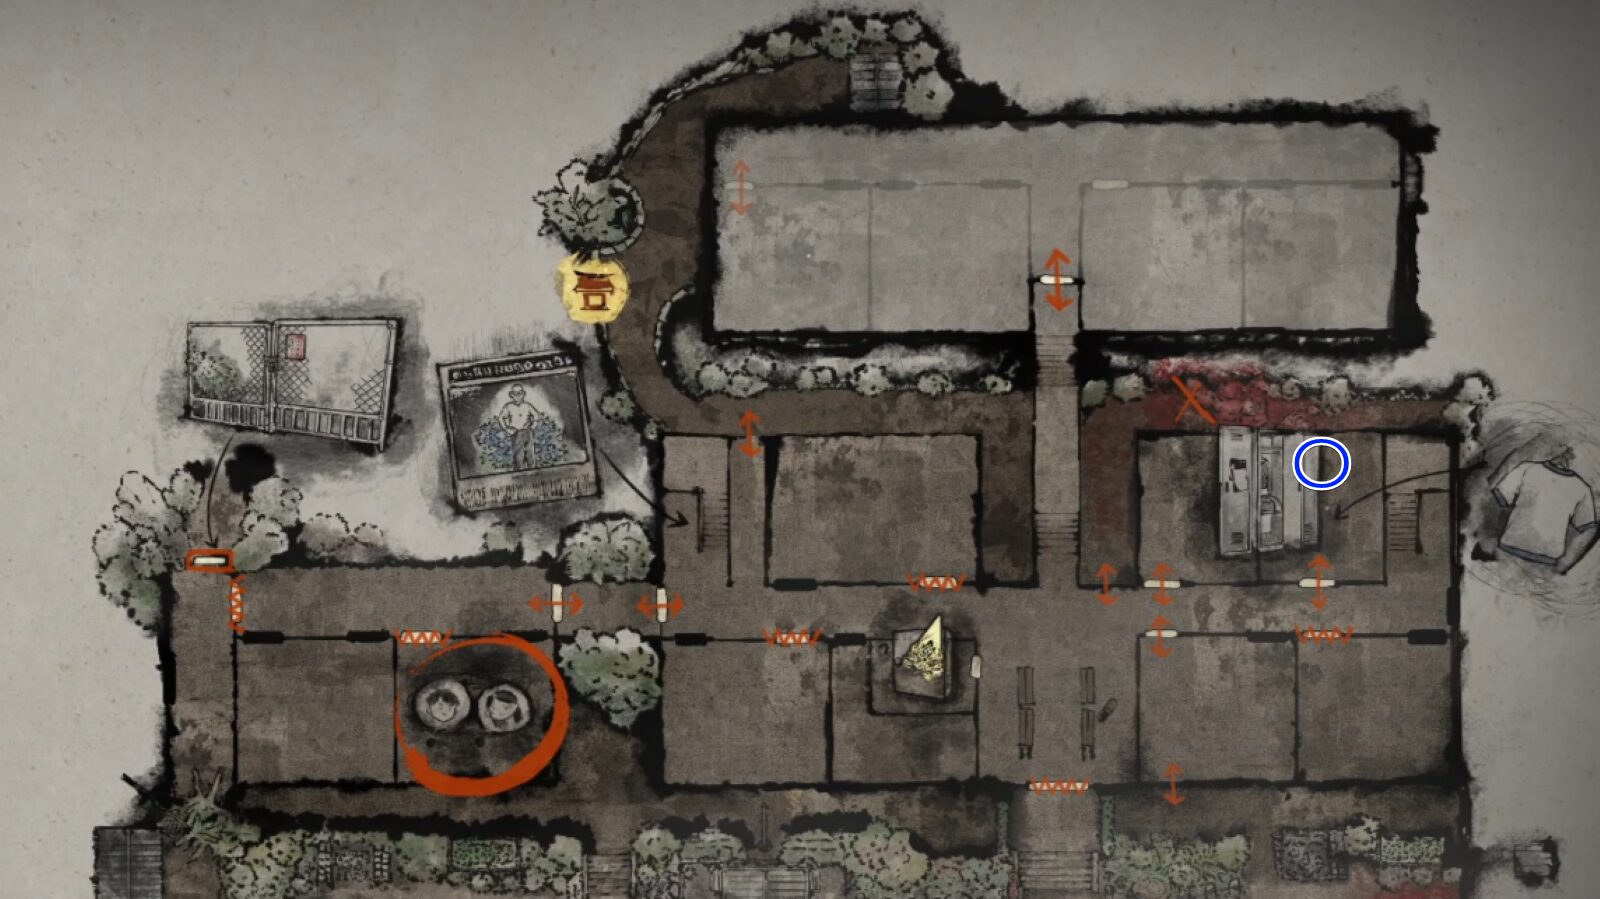
【Wolf】Location: Ebisugaoka Middle School – Girls’ Locker
The higher your remaining weapon durability, the more damage you deal.
Oh, totally — you mean the build that keeps weapon durability high with Crab and Wolf while constantly aiming for bonus damage.
There’s definitely synergy there, and the setup is strong. However, after testing extensively against Shiromuku on Lost in the Fog difficulty, I found that Weasel and Swallow outperform it, so the Wolf setup didn’t end up being featured in this guide.
I used to rely on the Crab & Wolf combo myself, so I still have a soft spot for it.
Related Guides
Here are my other SILENT HILL f guides. Feel free to check out anything that catches your eye.
