This page provides a detailed walkthrough of Main Hall, covering puzzles, optional routes, obtainable items, triggered events, and boss strategies with images to help you progress smoothly.
Use this guide to assist you throughout your playthrough.
| ←PREV Sugisato | NEXT→ Iwashimizu |
Main Hall Part 1/3
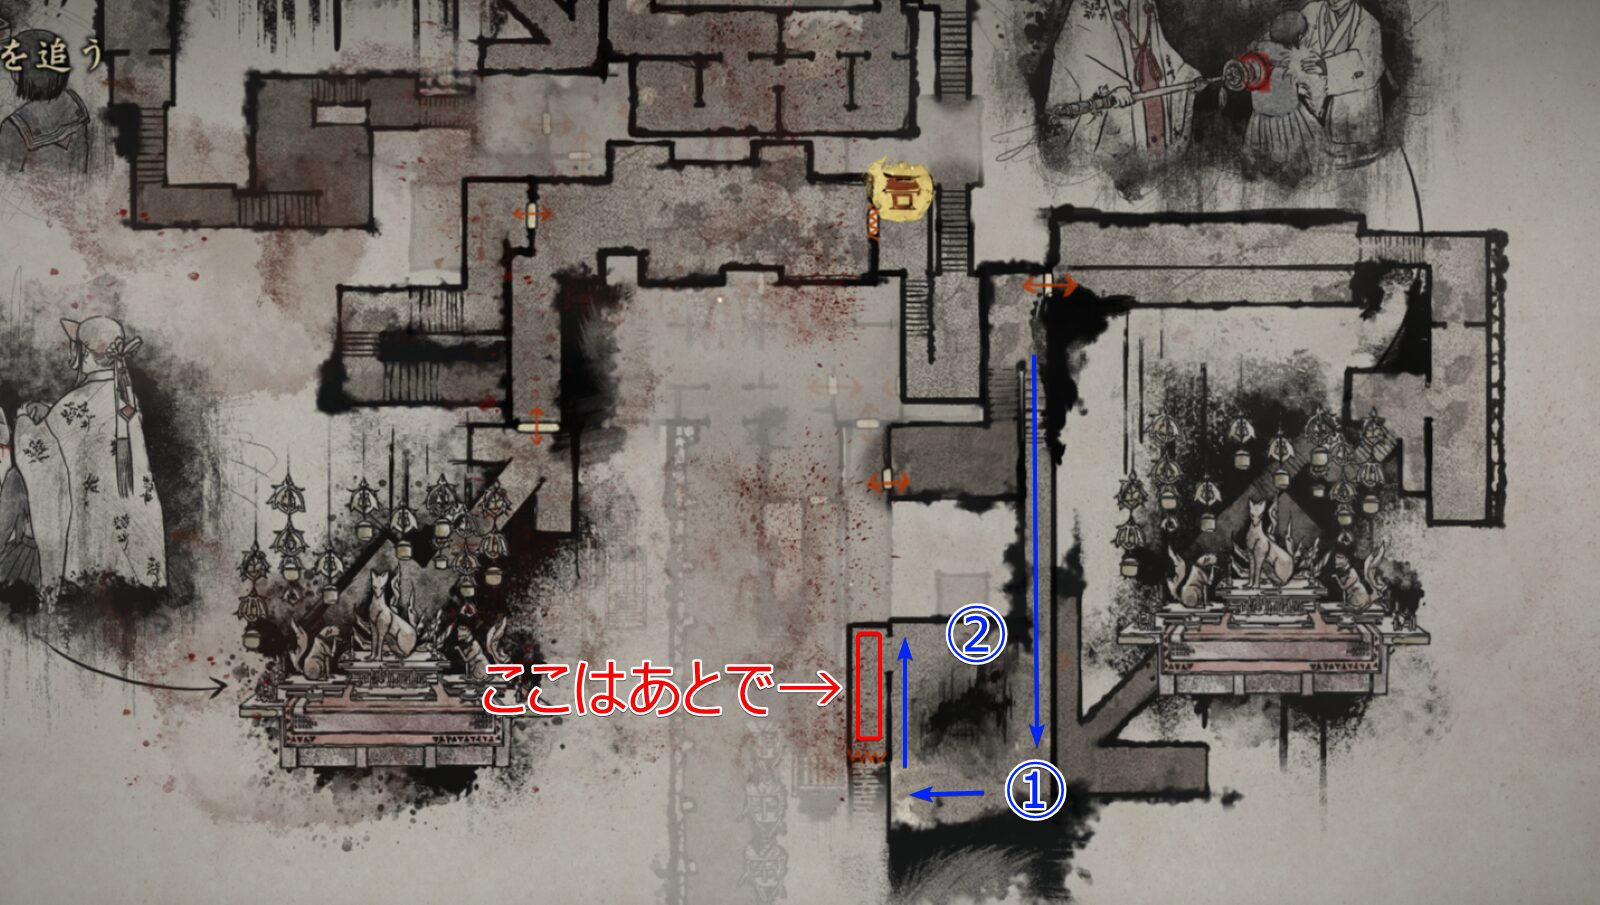
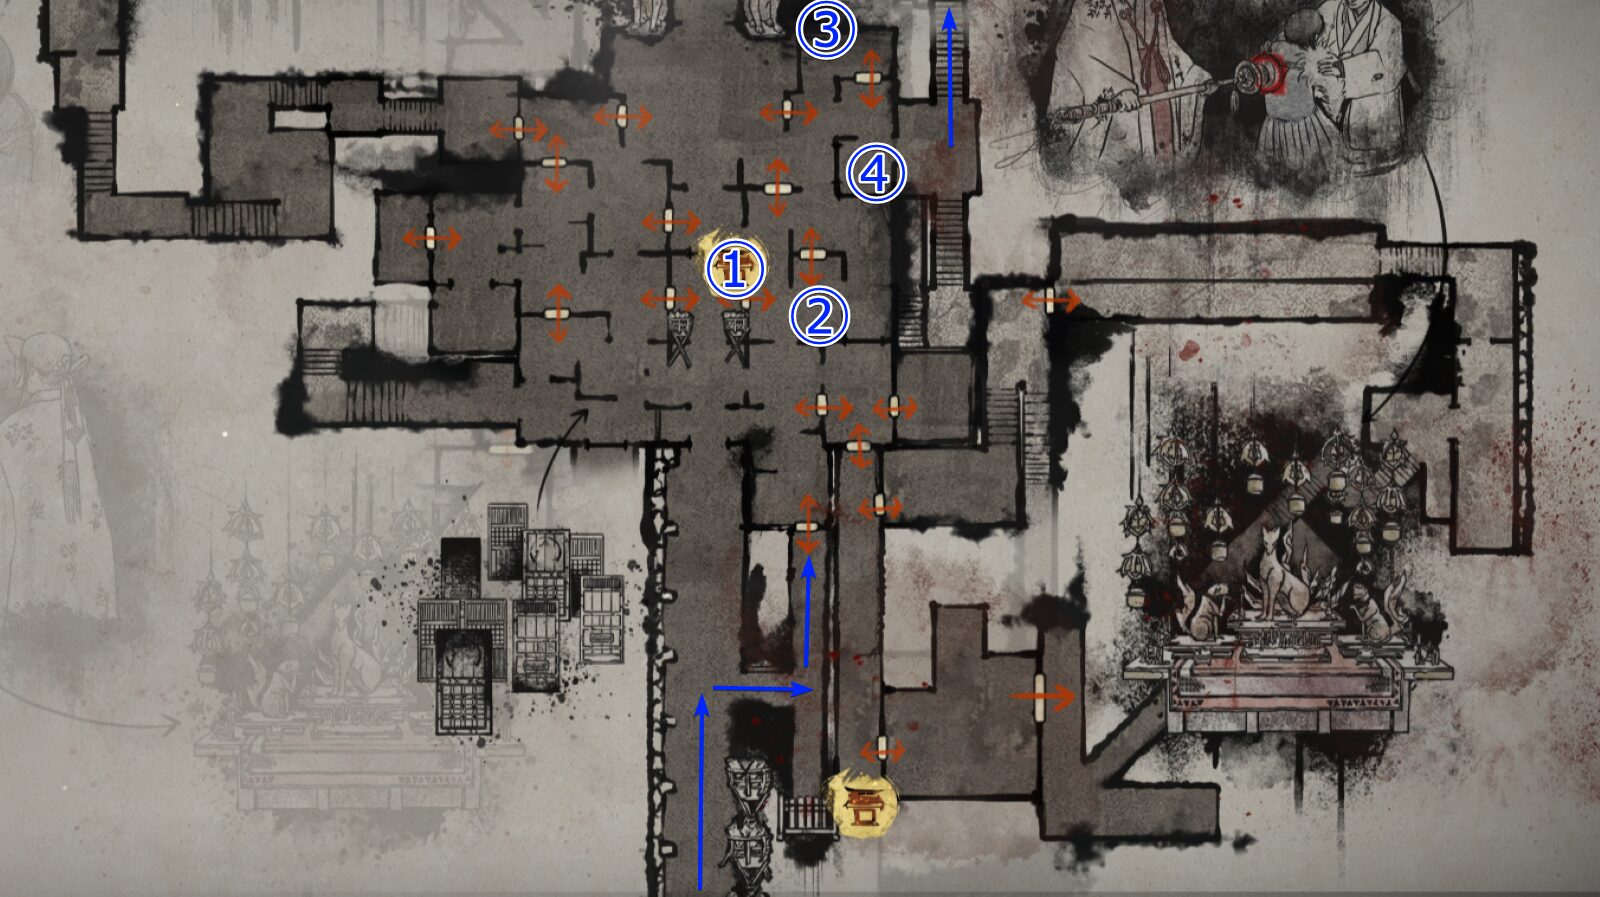 ┗① has a Hokora, so you may save here, but be careful of nearby enemies. A Journal Entry and some Higashi are close by. ┗② has Kudzu Tea, ③ has Higashi, and ④ has Arare. Head toward the blue arrow. (There is another Hokora at the opposite staircase.) ┗Sorry, I forgot to place a marker for the Yokan located roughly between ① and ③. If you want it, feel free to grab it. |
 ┗① has a Hokora. ②③ contain Bandage. ④ has a Dried Carcass. ⑤ has Yokan. ┗This intestine-like area is a hot zone, so avoid getting swarmed and try to engage enemies one-on-one. ┗At ⑥, an event will trigger. The altar holds a Shriveled Abura-age and some Divine Water. ┗Once you circle around to ⑦, it's basically a different game mode. You can pick up Divine Water nearby. Head to the first floor. |
| Things to Know |
| [Beast Arm] Edgy players will probably love this one. Its attack speed, damage, and range are all fairly good, so you’ll feel noticeably stronger — but it’s not busted-tier strong, so don’t get careless. Taking down enemies lets you soul-absorb them for a full kill. If you finish them with a heavy hit, they won’t revive even without absorption. You’ll also be able to open the iron door with a gap on the first floor. |
| [Enemy Ambushes] "Where the hell did THAT thing come from!?" — you’ve probably had moments like that, right? Those enemies are actually dropping down from the ceiling. The Main Hall has a ton of ceiling-based ambushes, and taking random chip damage here will quickly drain your healing items. When entering unexplored rooms, it’s easier to avoid ambushes if you scan the ceiling as you move. |
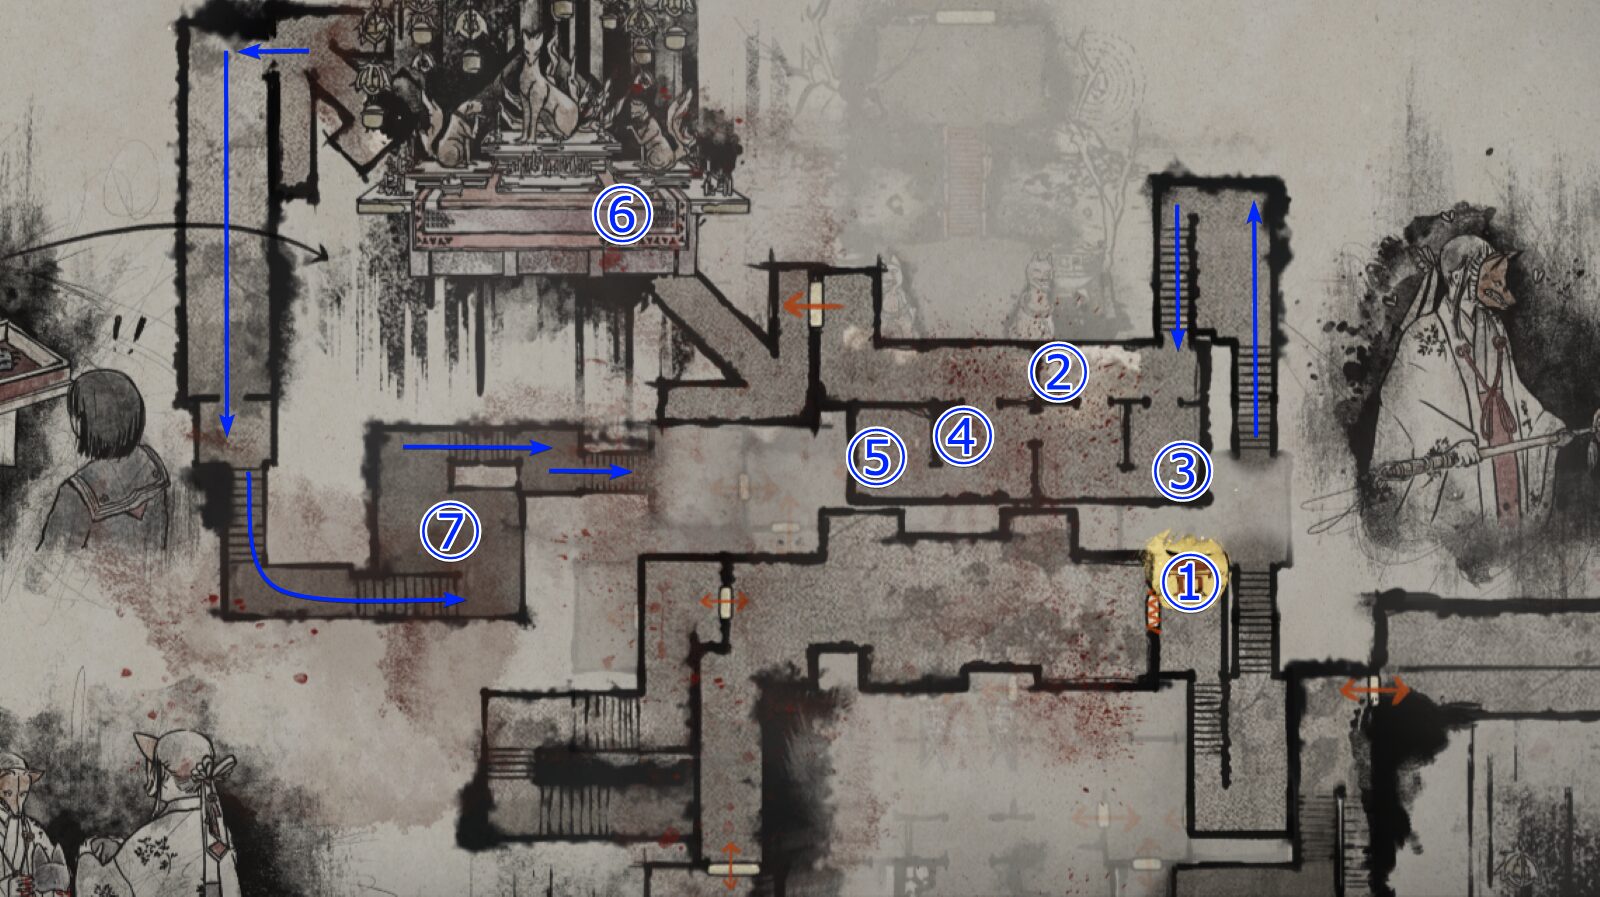
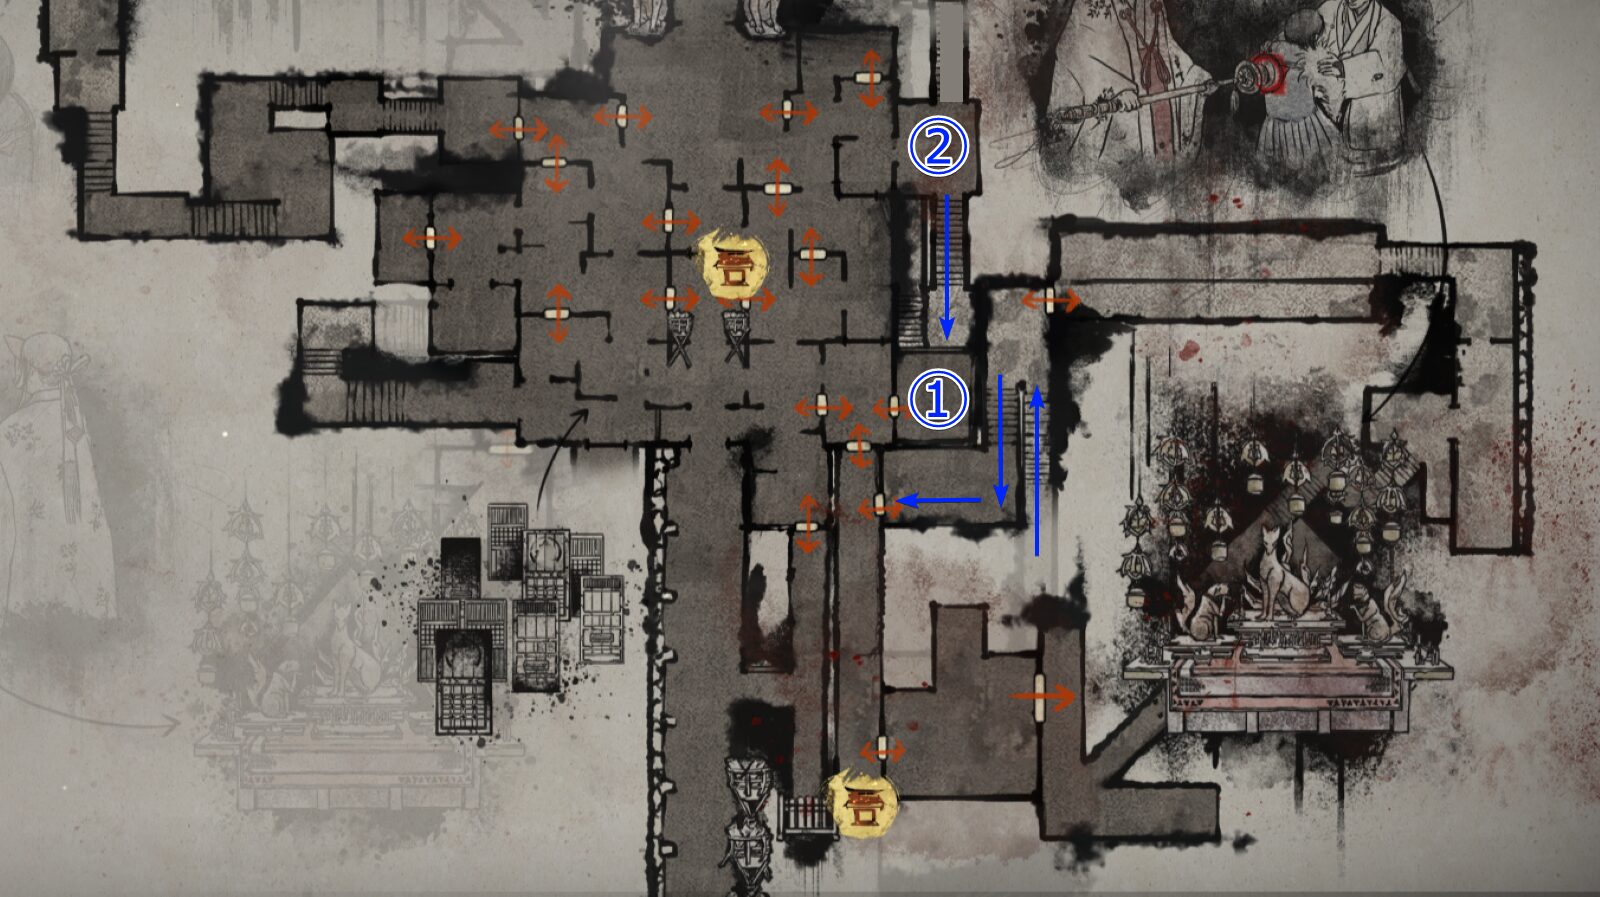
 ┗① has Arare. At ② you’ll find an Antique Comb and Yokan. You can enter ③; inside, pick up Inari Sushi, the Omamori【Crow】, and a Housemaid's Note. ┗Open the iron door from the blue arrow and head to ⑤. There’s also a Hokora nearby. ┗At ⑥ you’ll face the boss again in the Worship Hall. Once you take down the boss, absorb its soul and move forward. |
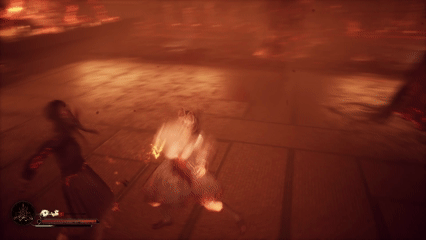
Boss Strategy: Tumor Woman
Action [Hard] When you enter the room, you’ll see a small enemy hanging from the ceiling at the back. This makes the fight even more troublesome than the one in the Worship Hall. The key is to eliminate this enemy first. If it teams up with the Tumor Woman, that combination becomes the primary cause of failure—stop it at all costs.
If you manage to keep the fight to 1 vs 1 + α, it shouldn’t be too difficult. Once you take it down, don’t forget you can absorb its soul.
Main Hall Part 2/3
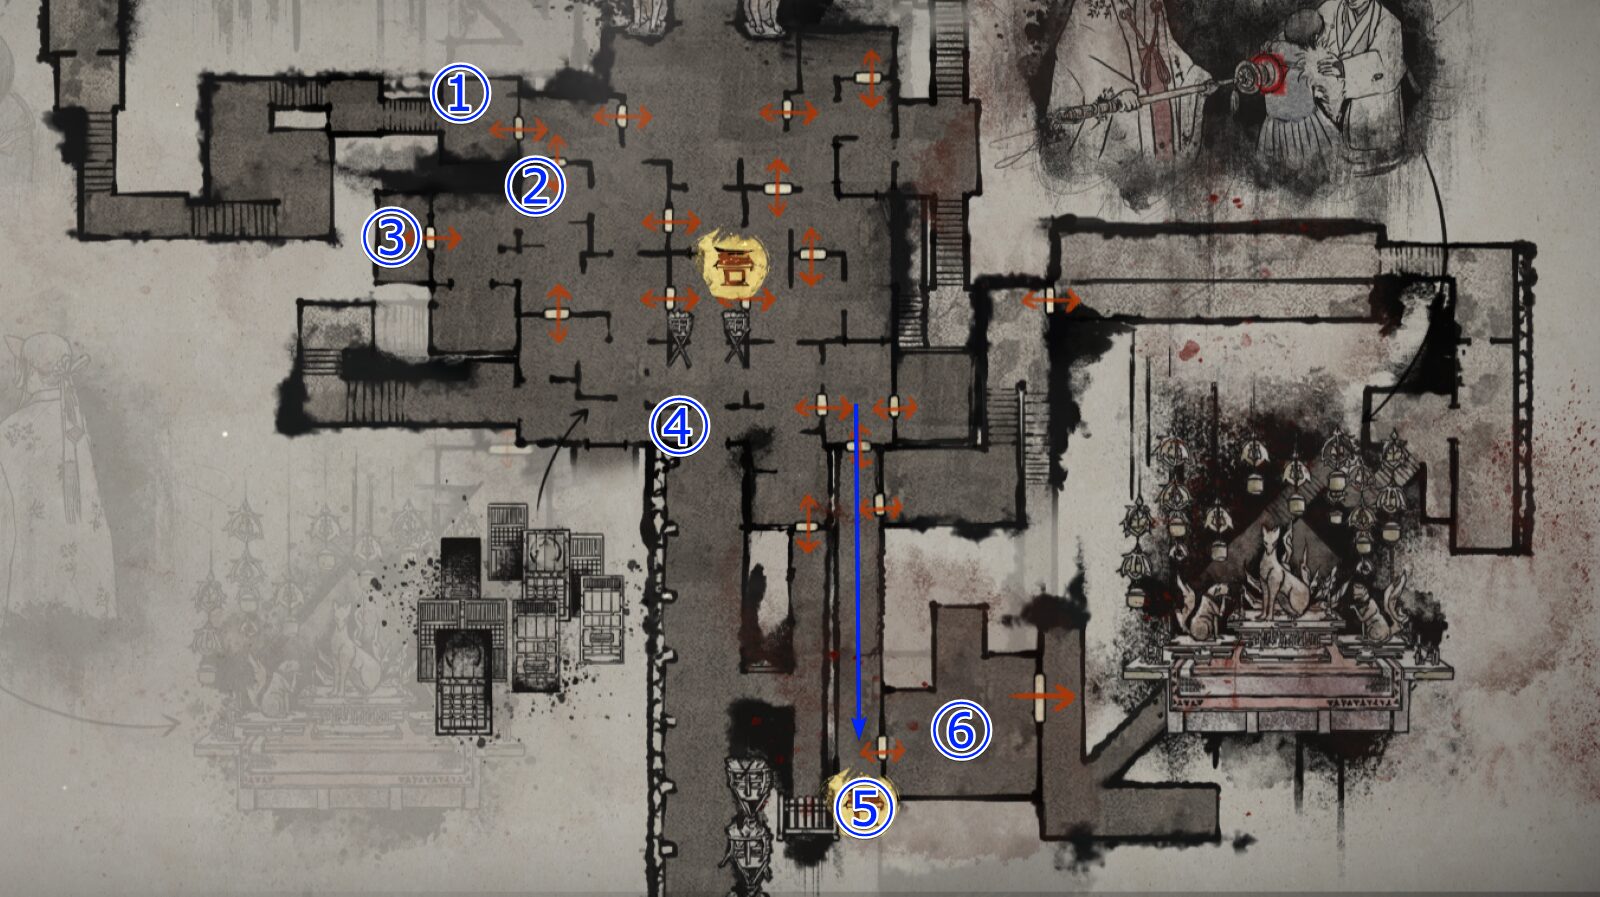
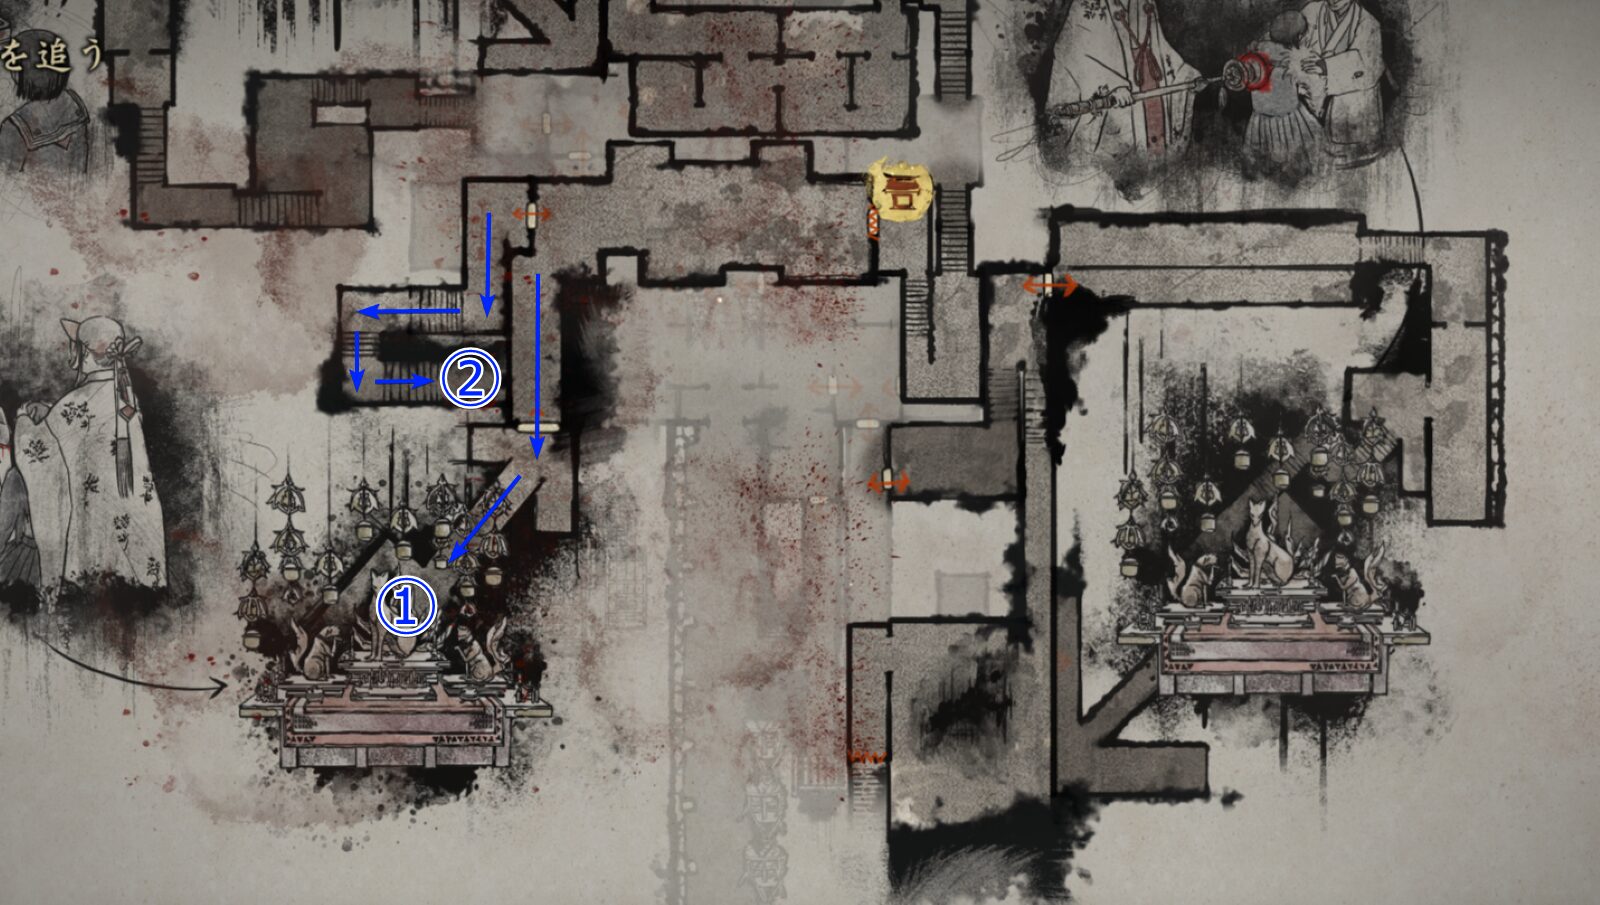
 ┗① triggers an event. There’s a Dried Carcass on the altar. At ②, you’ll find Arare. ┗When you reach ③, a swarm of enemies will appear, but don’t panic—you can mow through them with ease. ┗There’s ④ with Yokan. Feel free to save at the Hokora. ┗Head toward ⑤. |
| Things to Know |
| [Beast Arm Awakening] Most of the explanation is the same as in the game. The Kudzu Mark refers to the icon on the left side of your status bar, and this serves as your Awakening Gauge. (At first, I thought Hinako’s back itself was the gauge.) While awakened, Hinako becomes Invincible, but instead of taking damage, the remaining Awakening time decreases whenever she is hit. Avoid what you can, and parry what you can read — doing so will turn it into an even more effective Super Hinako Time. |
| [You Can Now Open Branded Doors] You can now open the iron doors on the first floor marked with a red brand. These are different from the iron doors with gaps. This unlocks new areas for further exploration. |
 ┗Head toward the room marked by the blue arrow. There are enemies inside, so take them down first. ┗① contains Bandage. At ②, you can pick up an Antique Comb and a Dirty Drawstring Bag, which increases your item carry limit. ┗The area marked with the red frame will become accessible later. You don’t need to enter it now, but grabbing the Dirty Drawstring Bag early is recommended. ┗Return to the first floor. |
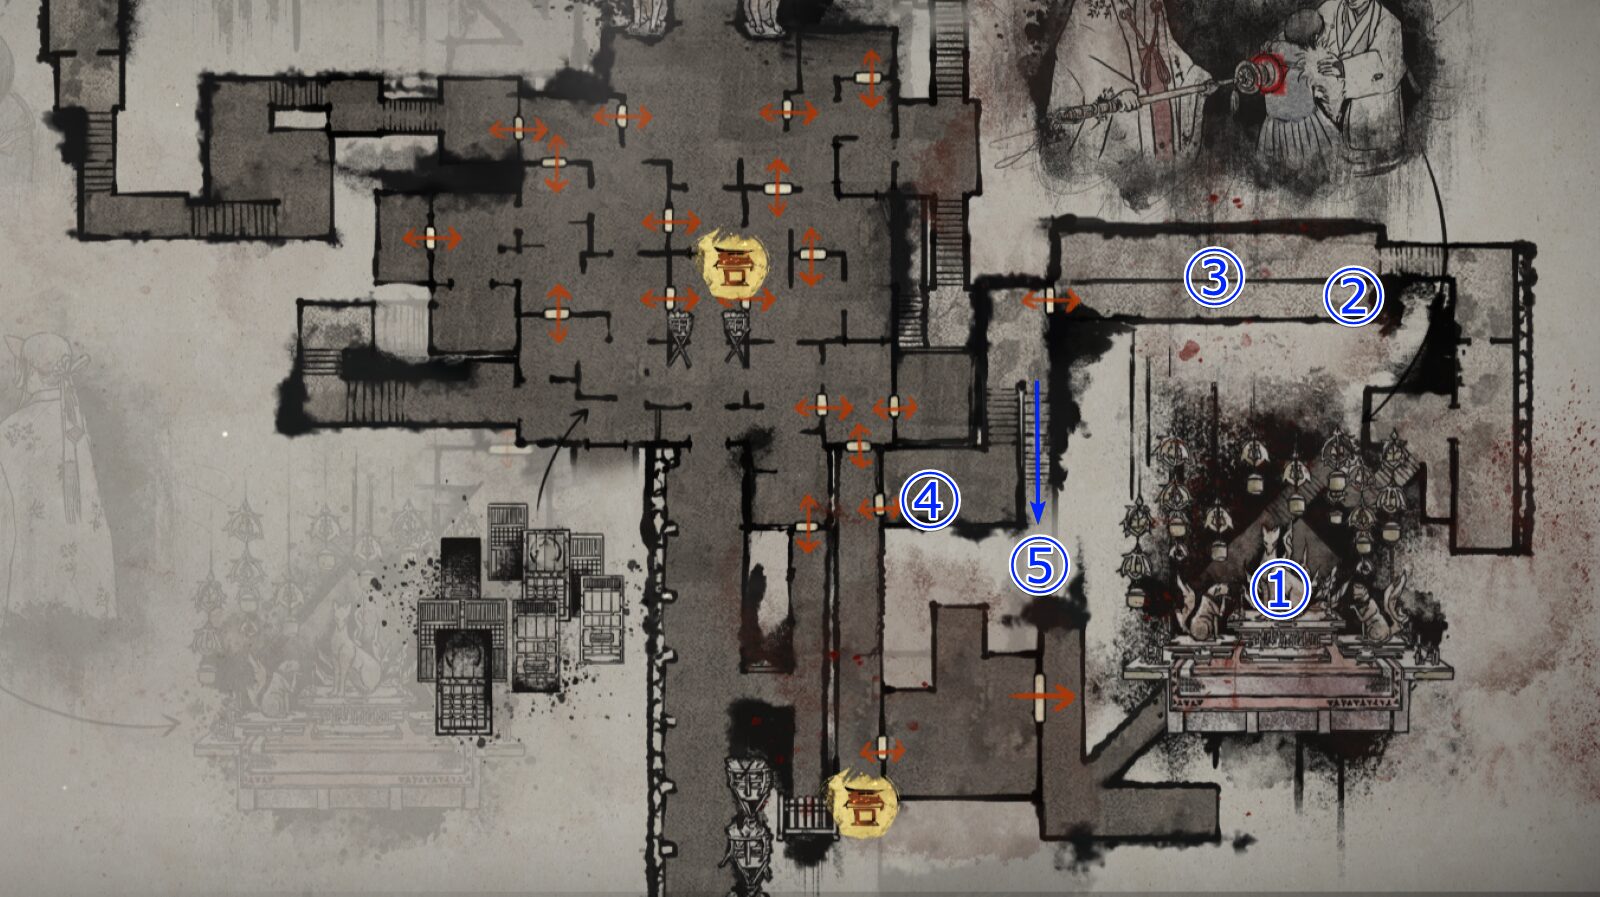
 ┗Head down from the second floor and enter room ① to pick up a Journal Entry, some Higashi, and an First Aid Kit. ┗Proceed toward the blue arrow via the stairs at ②. ┗Once you're back on the second floor, save at the Hokora. There's a Boss fight ahead. |
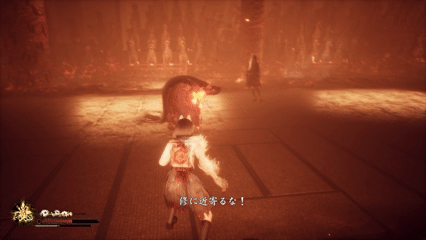
Boss Strategy: Drum
※For clarity, this guide applies unofficial labels to bosses whose official names have not been disclosed. These names are used solely for reference purposes.
Defeat the Minions First
Take out the minions hanging from the ceiling before dealing with the Drum, and make sure to take down (and Soul Absorb) the minions first to secure a 1-on-1 fight.
The chaotic brawls in this place are already tough, and the Drum’s special attacks that utilize nearby minions make things even worse.
If you eliminate the minions, the Drum will lose most of its attack options and be forced into close-range combat, making the fight dramatically easier.
Awakening Makes Minion Cleanup Stable
Activating Awakening allows you to attack safely and quickly without the hassle of Soul Absorption.
The ideal strategy varies depending on the Action Difficulty, but on [Story] it’s best to prioritize the Drum, while on [Hard] you should focus on the minions first and use remaining Awakening time to strike the boss.
If you use Awakening early on, the fight ends surprisingly quickly. I saved it for later, but honestly, there was no real reason to hold onto it for the Drum.
Attack Patterns
① Launches Minions with Threads
When it beats the drum on its stomach, that’s the signal. It manipulates minions connected by thin threads and launches them at Hinako at high speed.
Dodge this attack. Naturally, if no minions are nearby, this move never happens.
② Arm Swings
Used when you’re close. It swings its arms three times in a row, so keep your distance.
The wind-up is long, making it one of the easier attacks to time and evade.
Main Hall Part 3/3
 ┗After taking down the boss, collect the Higashi and Bandage in the room. Trigger an event at ①. An Antique Comb is located beside the altar. ┗Head downstairs from ②. |
| Things to Know |
| [Mask of the Fox Clan - Effect] It has no combat benefits. Instead, it allows you to remove ofuda wall by focusing. This lets you access areas that were previously blocked by ofuda seals. There are several optional paths worth exploring, so I’ll explain them below. |
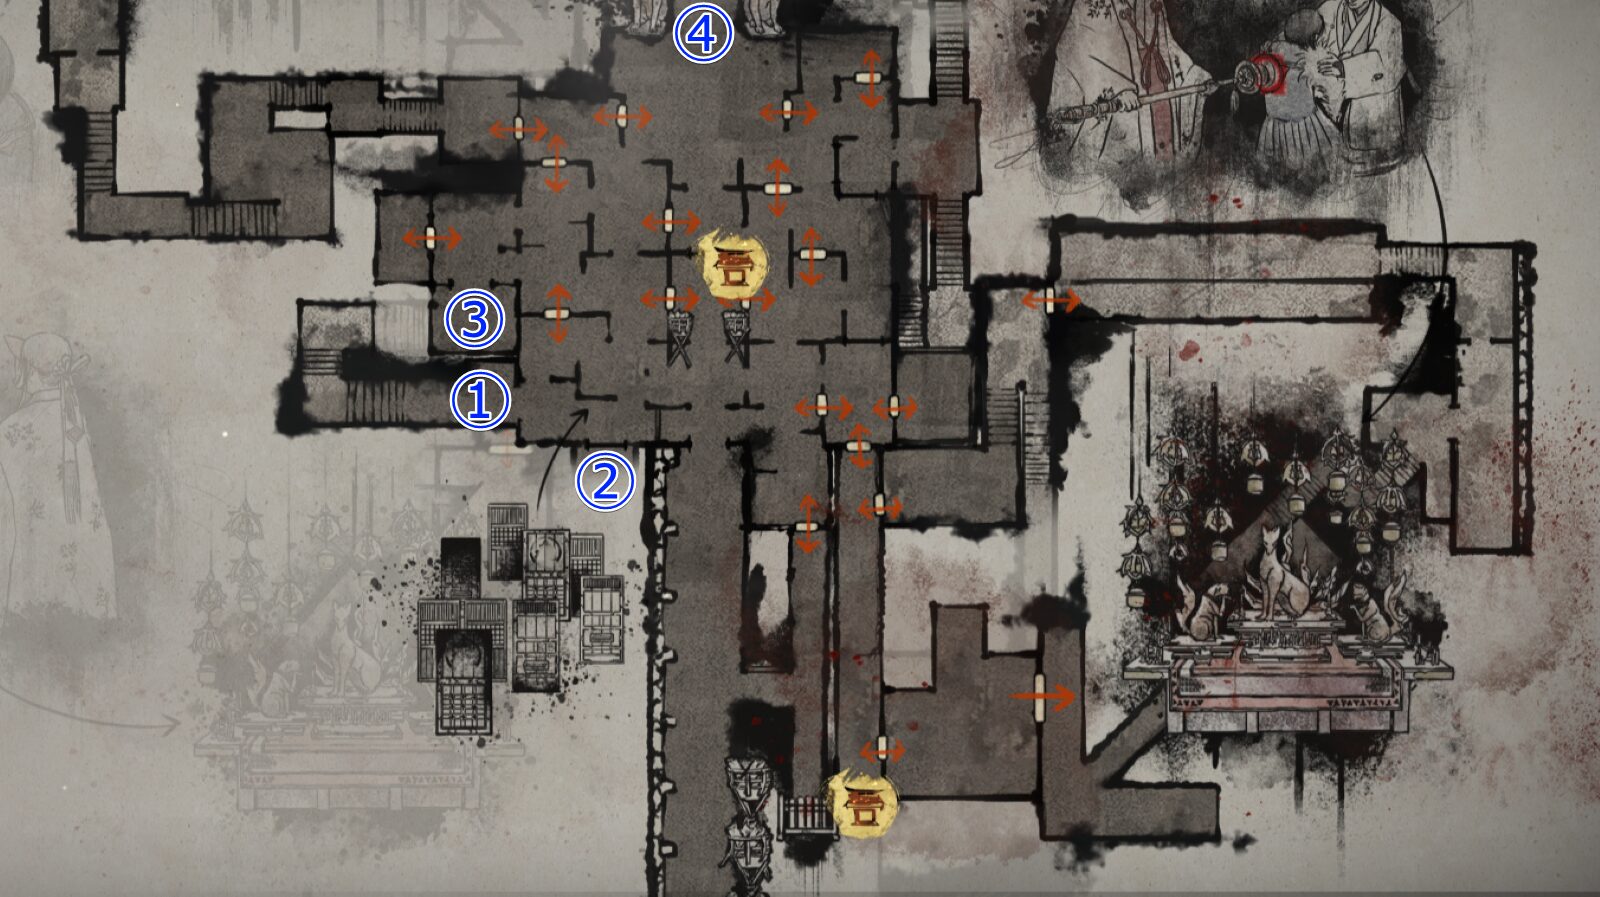 ┗At ①, you’ll find Divine Water. Use Focus to remove the ofuda wall in front of you. Remove the one at ② as well to obtain another Divine Water. ┗At ③, you can pick up an Ema, a Shriveled Abura-age, and a Family Physician's Logs. ┗You can also remove the ofuda wall located where you previously found the Dirty Drawstring Bag (the bottom-right area of the Main Hall 2nd floor). Beyond it, you can obtain a Dried Carcass. You still cannot open the door with the Inari crest. ┗Remove the wall at ④, pick up the Divine Water and other items, then save at the Hokora. After the event, a Boss Battle begins. |
Boss Strategy: Ritual Overseer
※For clarity, this guide applies unofficial labels to bosses whose official names have not been disclosed. These names are used solely for reference purposes.
In addition to a well-rounded moveset that mixes physical melee attacks and ranged assaults using magma, this boss goes as far as igniting summoned classmates and sending them charging toward Hinako—a downright nasty tactic.
This description might make it sound overwhelmingly strong—and yes, it is powerful—but its actions and attacks feel relatively sluggish.
Even without relying on Counter or Focus Attack, there are still opportunities to land hits.
Start the Battle Already Awakened
Just start hitting the boss.
Due to the mechanics of the Beastly Arm, avoiding attacks whenever possible is ideal to conserve time.
Attack Patterns
① Magma Eruption
The boss crouches down, causing magma to erupt from the ground nearby.
This often happens right after being staggered by your attacks. Create distance.
Once you've dealt enough damage, it can erupt magma in a straight line toward Hinako, or trigger multiple random eruptions.
Watch the ground carefully and dodge accordingly.
② Strikes with the Shide Wand
The boss performs several consecutive swings using the wand in its hand.
It has two patterns—two swings while approaching and three swings without moving—and both contain a Counter opportunity. Stay focused.
③ Magma Throw
The boss scoops magma from its mouth and hurls it toward Hinako.
The long wind-up makes it easy to react, and dodging through the projectile’s path helps secure a Perfect.
Great for recovering Stamina.
④ Summon Classmates
Multiple enemies appear, so defeat and Soul Absorb them to reduce their numbers.
If a classmate is ignited by the boss’s Magma Throw, it charges toward Hinako and explodes. Pull them in first, then dodge—you'll avoid most hits.
Defeating the boss without taking damage from this attack unlocks an Achievement.
You can also cancel Awakening at the start to rebuild the Kuzu Seal gauge, then reactivate it once the classmates begin appearing, preventing their revival entirely.
| ←PREV Sugisato | NEXT→ Iwashimizu |
Related Guides
Here are my other SILENT HILL f guides. Feel free to check out anything that catches your eye.