
This guide explains efficient ways to take down the Sakuko-Like Entity (referred to as Priestess in this guide), key things to know, and its attack patterns.
Use this guide to assist you throughout your playthrough.
※For clarity, this guide applies unofficial labels to bosses whose official names have not been disclosed. These names are used solely for reference purposes.
Boss Strategy: Priestess
Where This Boss Appears: Corridors Walkthrough
It is something that resembles Sakuko. Since it has no official name in the in-game UI, this guide refers to it as [Priestess].
Maintaining distance while landing counterattacks after successful dodges is the safest strategy.
This enemy has a wide variety of attack patterns and each hit deals heavy damage, so attempting to brute-force your way through will require exceptional timing and reaction skills—especially on Hard difficulties.
Attack Patterns
① Club Throw
When she raises the club in her left hand, that's your cue. She will throw it, so sidestep horizontally to avoid it. Moving straight backward is a bit risky.
On [Hard] difficulty, an additional pattern occurs after the throw.
・Throw → Recall
The recalled club deals damage on the way back. She often repeats this sequence twice, so expect two full sets.
The motion is fast, and if you get careless, you'll lose most of your HP. Even if you get hit, don’t panic—quickly dodge sideways.
・Throw → Look Left or Right → Swing Attack
After throwing, she will swing the chain-sickle in the direction she looks. It becomes a wide-area attack, so keep your distance.
② Grapple Attack
When she takes a tackling stance, it's a grapple attempt. Sometimes she speaks a line, making it easier to react.
She tracks you until right before charging, so dodge sideways at the last moment. You can land at least one hit after her motion ends.
③ Melee Combo
She performs 4–5 consecutive melee attacks.
You can simply dodge away, but since the timing is easy to read, performing a Counter dodge and then disengaging is also viable.
Sometimes she ends the combo with a chain-sickle spin attack. It's safer to keep your distance afterward.
④ Club Slam
This is a strong Counter Chance. She charges the stance in two phases—perform Concentration + Heavy Attack when the brief inverted visual effect appears during the second phase.
You can follow up with an additional Heavy Attack afterward.
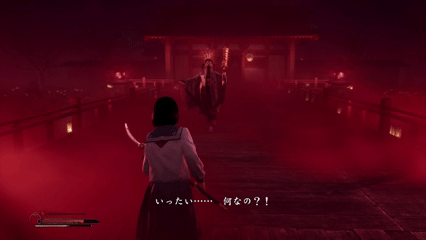
⑤ Teleport & Chant
She performs this during the mid-phase and final phase once her HP is lowered.
She teleports to a distant spot and begins chanting a full-area attack. Interrupt it before activation.
Find the Priestess whose back ornaments are glowing and land a Heavy Attack to interrupt her.
The teleport destination varies—sometimes beside the great gate, sometimes on the bridge. Using headphones is recommended to pinpoint her position quickly.
If you interrupt every full-area chant and defeat her, an Achievement will unlock.
Related Guides
Here are my other SILENT HILL f guides. Feel free to check out anything that catches your eye.