This page provides a detailed walkthrough of Shimizu Residence, covering puzzles, optional routes, obtainable items, triggered events, and boss strategies with images to help you progress smoothly.
Use this guide to assist you throughout your playthrough.
| ←PREV Iwashimizu | NEXT→ Treasure Hall |
Shinmizu Residence – Part 1
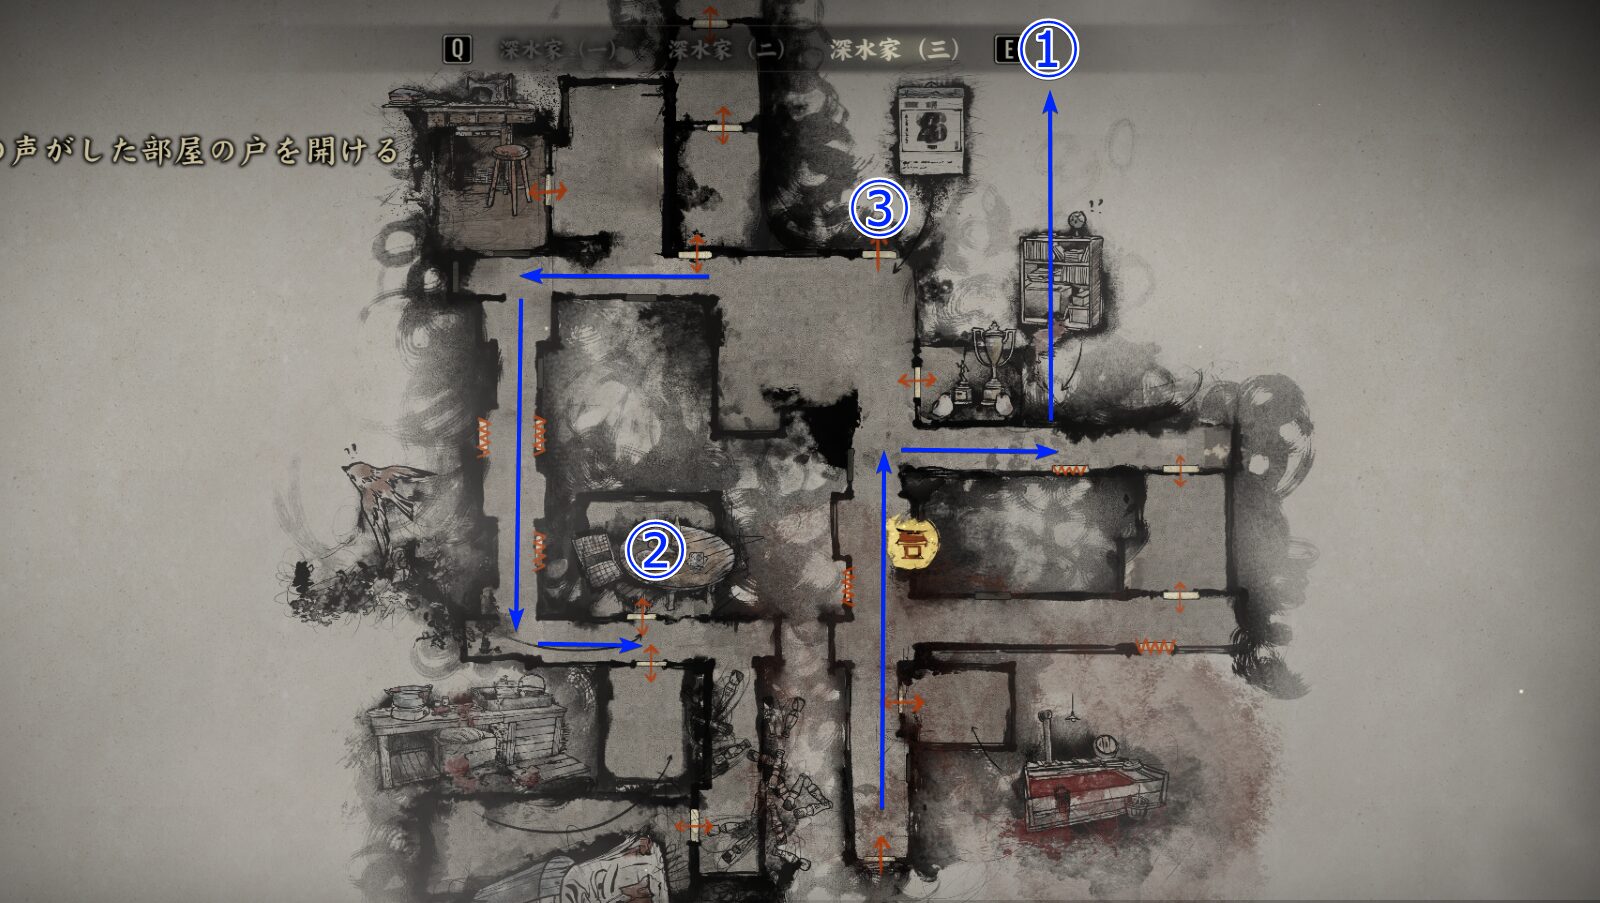
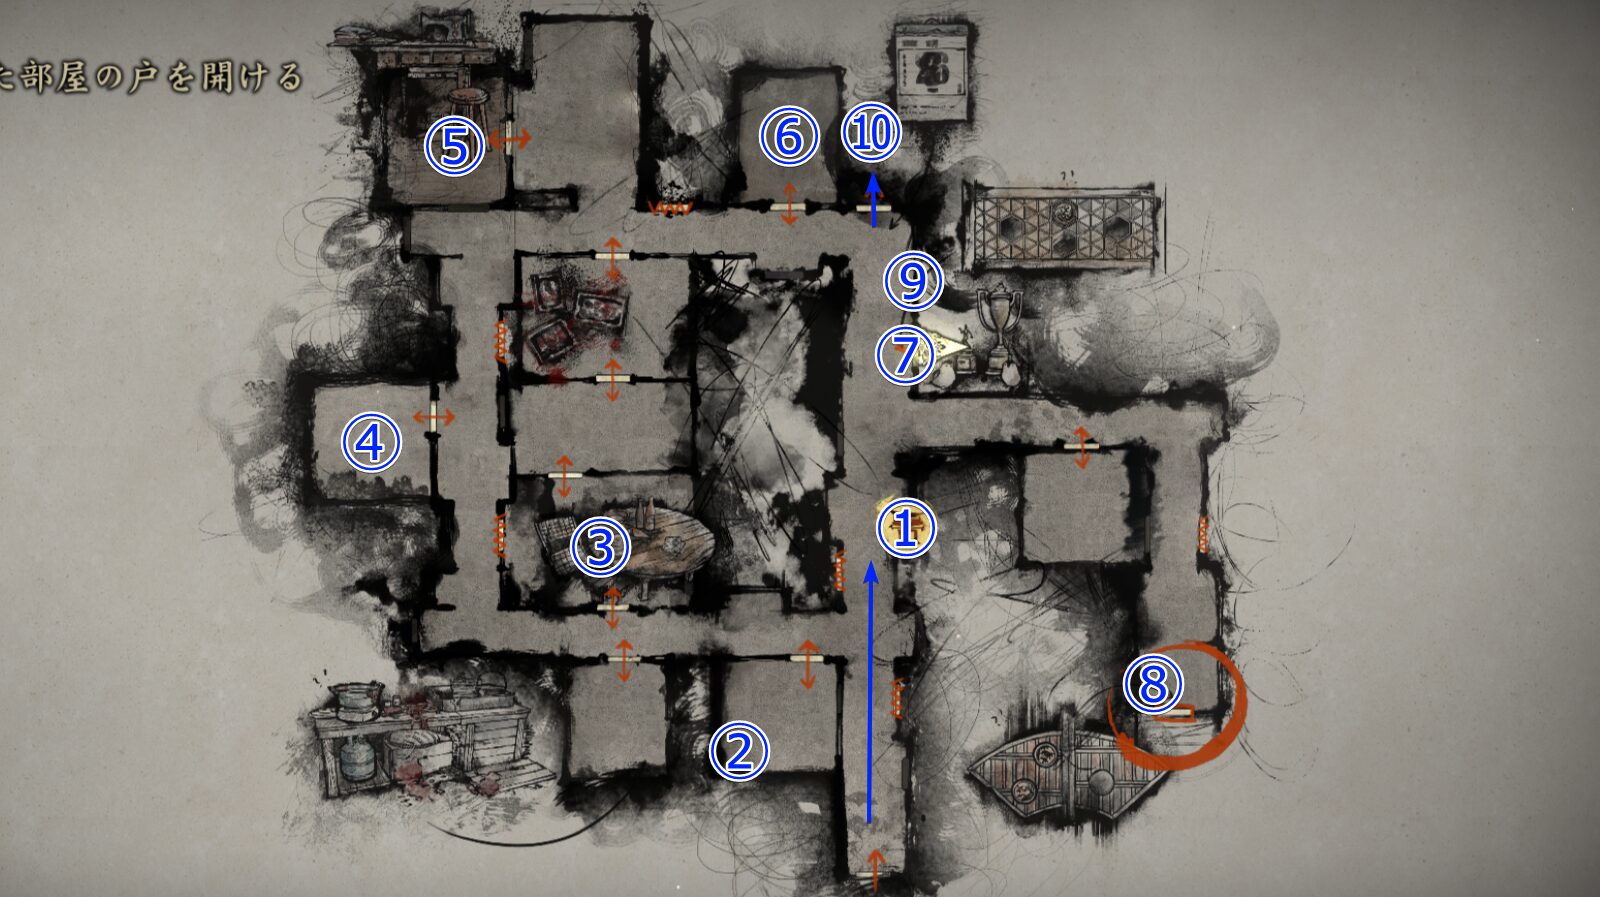 ┗① Use the Hokora here to save your progress. ┗In room ② you'll find Inari Sushi. Across the hallway after exiting the room, pick up an Antique Comb. Room ③ contains Arare and Ramune. Room ④ has Bandage and a Weapon [Axe]. ┗In room ⑤ you'll find a Journal Entry and Divine Water. At ⑥ you'll discover a Dried Carcass. ┗Inspect the hanging scroll and door at ⑦ to obtain the ⑧ Calendar. There's also Higashi in the room located between ⑦ and ⑧. ┗Hang the Calendar at ⑨ and proceed toward ⑩. |
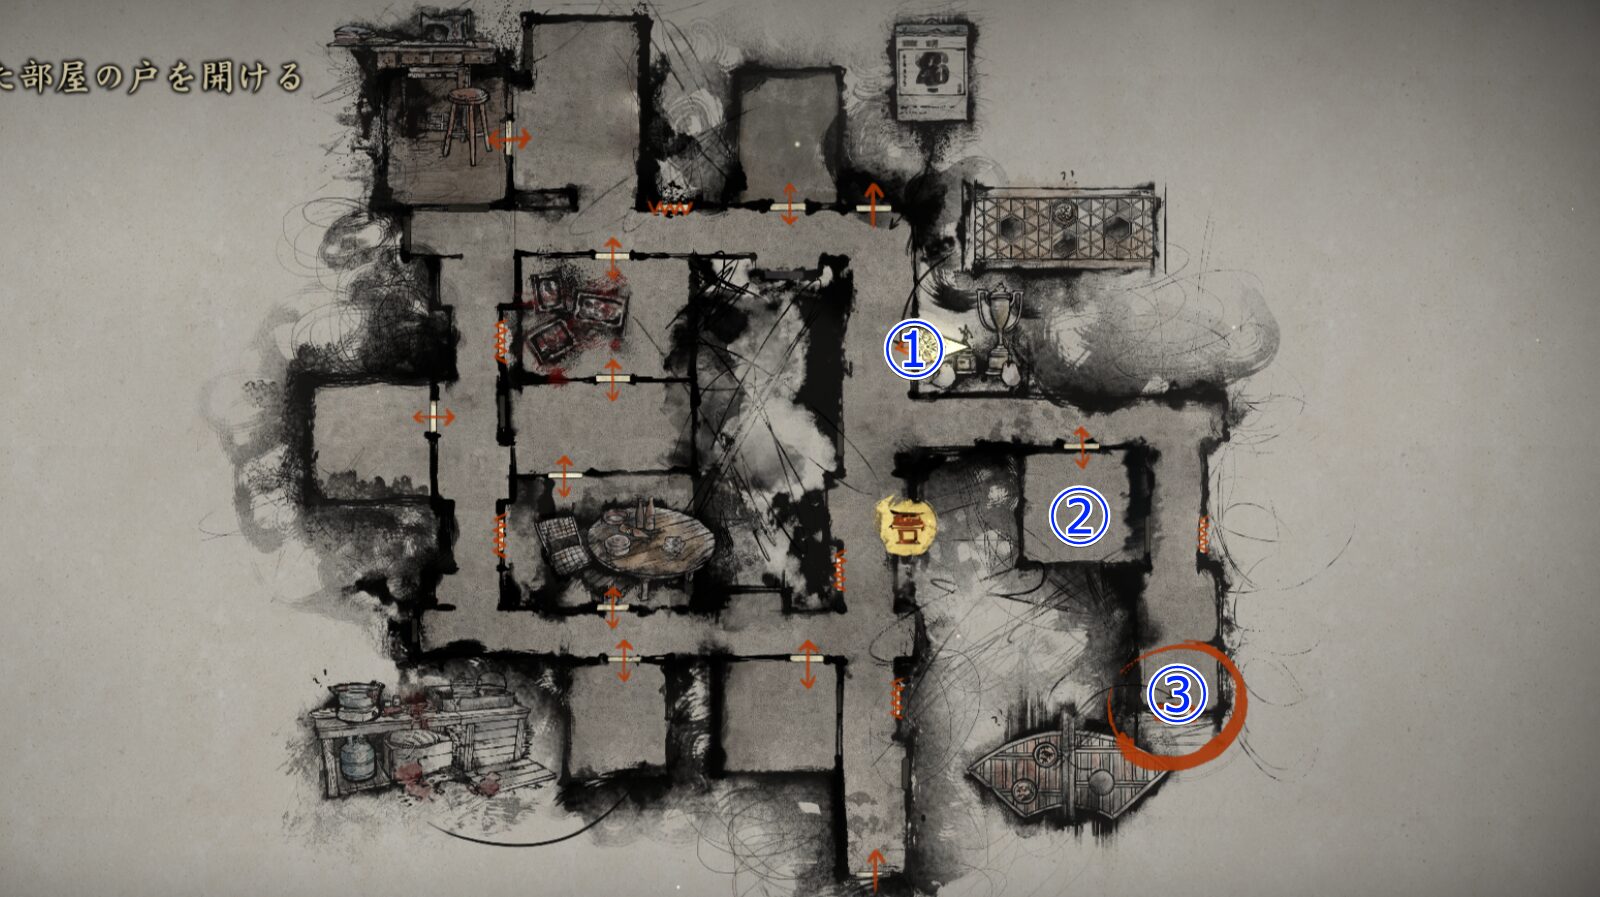
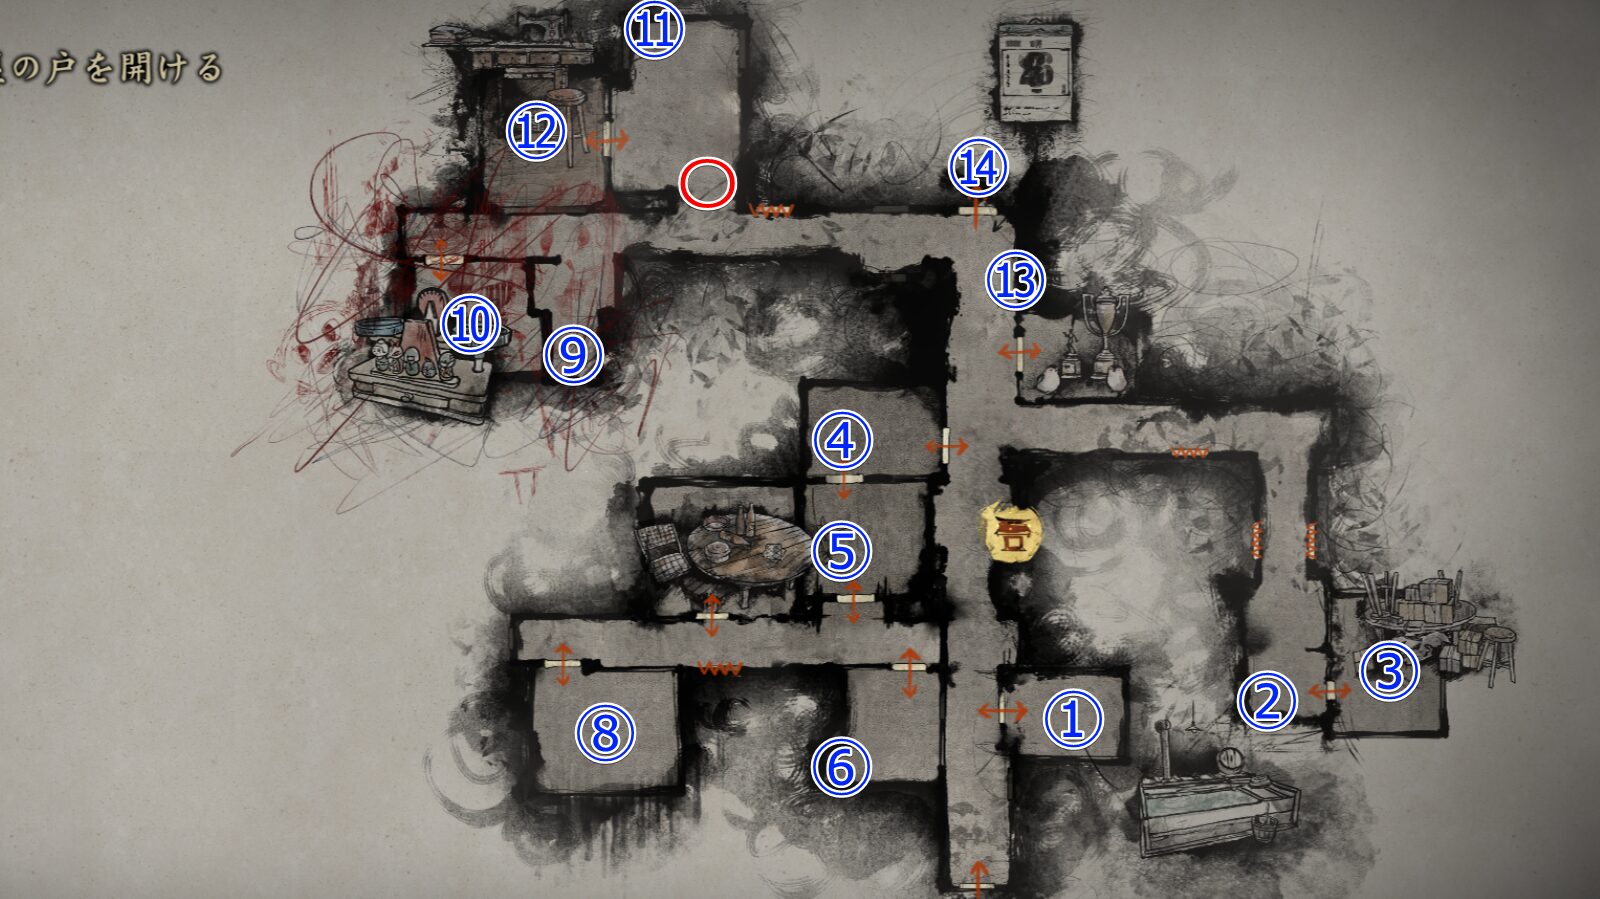 ┗① contains Bandage. At ② you'll find Shriveled Abura-age. Room ③ has a Tool Kit and a Picture Frame. ┗At ④ you'll find a Dried Carcass. At ⑤ there's a Weapon [Sickle]. At ⑥ you'll obtain an Ema. ┗In the opposite room (marked by a low dining table), you'll find Arare and a Yellowed Calendar. Room ⑧ contains Ramune. ┗At the location marked with the red circle you'll encounter the [Tumor Woman]. Defeating her is optional, so as long as you collect items at ⑨⑩⑪⑫, you can ignore her. However, the item required for the puzzle in ⑩ is mandatory. The corridor is narrow, so if you can't slip by her, you'll have to fight. ┗At ⑨ you'll find a Blessed Hand Mirror, likely available only on the [Hard] Action Difficulty. Solve the scale puzzle at ⑩ to obtain the Scales Plate. ┗At ⑪ you'll find Chocolate. Room ⑫ contains Kudzu Tea. ┗Hang the Yellowed Calendar at ⑬ and proceed toward ⑭. |
| Things to Know |
| [Changes in New Game +] Regardless of puzzle difficulty, the puzzles from the Shimizu Residence to the Treasure Hall are altered to accommodate the branching endings. Some key items are also confirmed to appear in different locations compared to the first playthrough. However, the changes are minor. They are not difficult enough to soft-lock your progress, so don’t worry. Details regarding the altered puzzles and conditions are explained in the Ending Route Requirements article. |
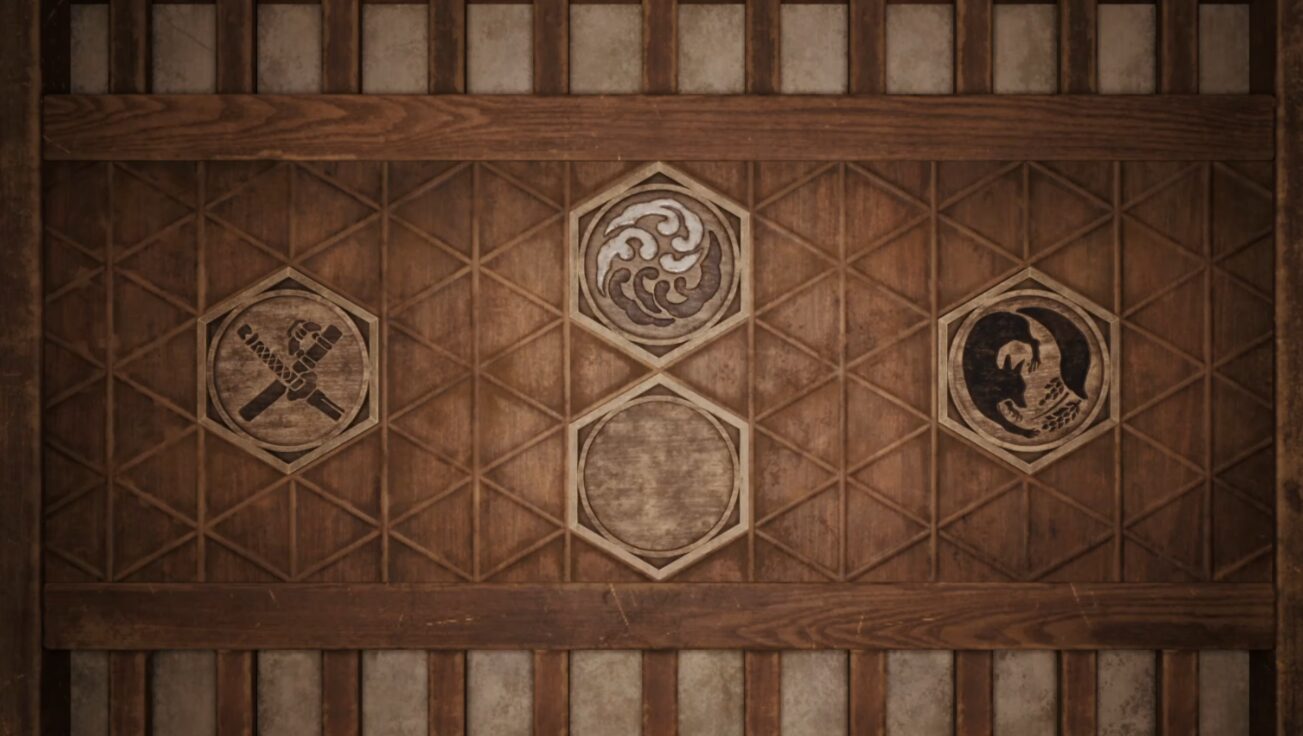
| [Puzzle: Scales] Based on the hint written on the wall, the message seems to be that you must balance the scales. Check the weight of each of the five dolls and think about how to distribute them. The solution is folded below. |
Shinmizu Residence – Part 2
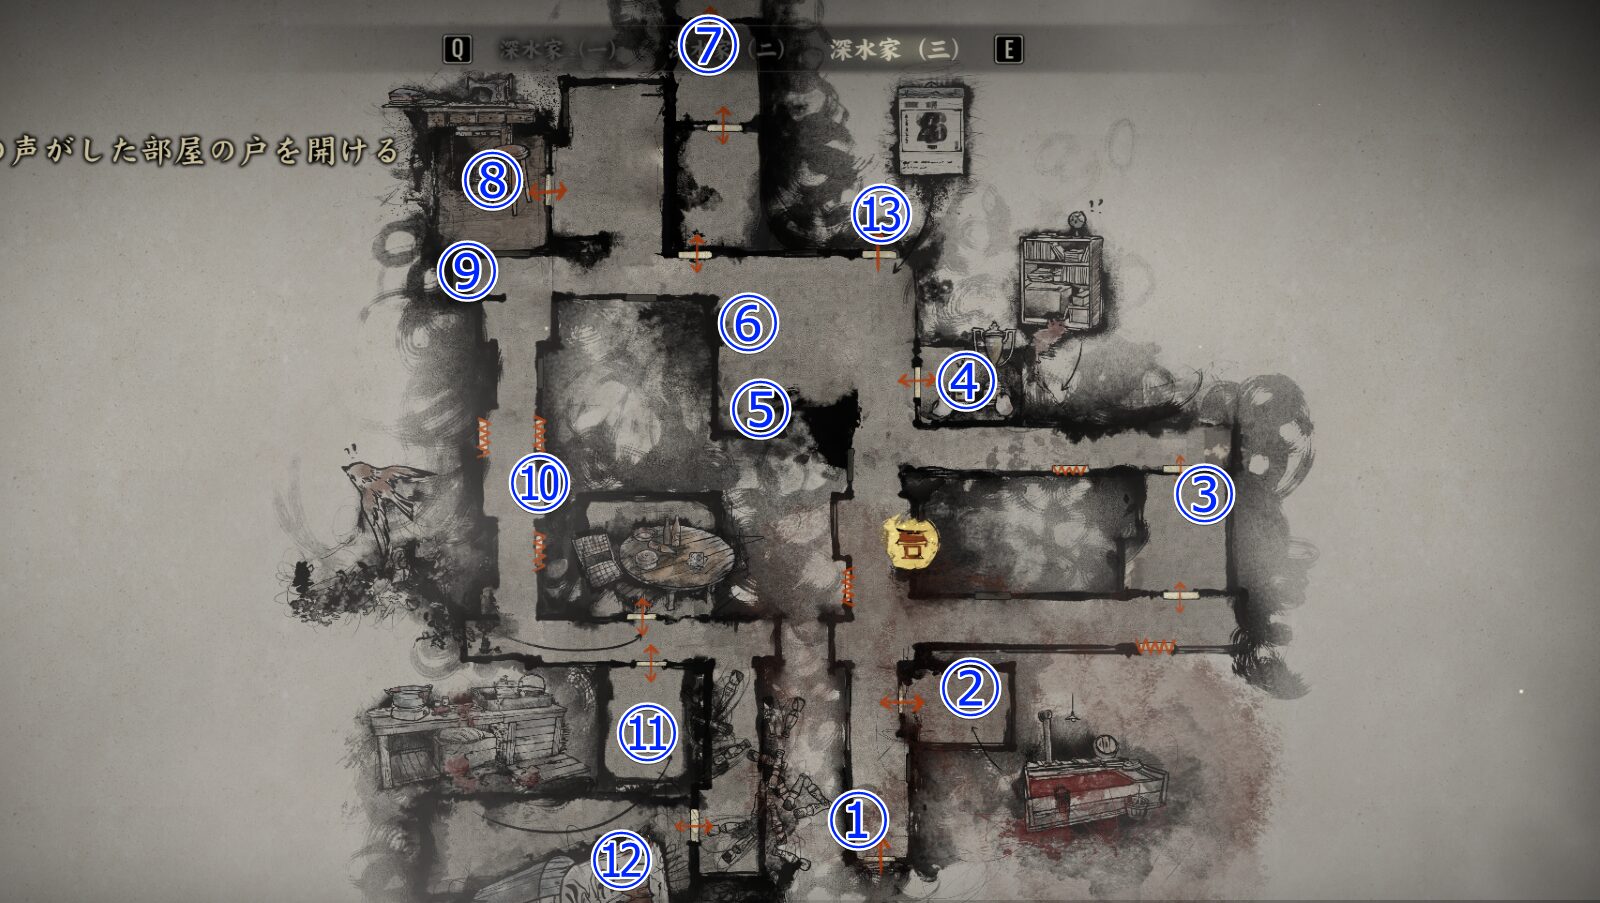 ┗① has Ramune. ② has a Weapon [Kitchen Knife]. ③ has Shriveled Abura-age. After leaving the room, head right to find a Tool Kit. ┗④ has a room with a Journal Entry. Check the Bloodstained Shelf. Examine the center of the bottom row to obtain a Block of Wax from the diary. ┗⑤ has Divine Water. ⑥ has Arare. ⑦ has Yokan. past ⑦, there’s another room (not fully shown in the image) where you can pick up a Dried Carcass. ┗⑧ has a Bandage. ⑨ has an Ema. ⑩ has Chocolate. The room at ⑪ has a Tool Kit, a Propane Tube, and a Furoshiki that increases your inventory capacity. ┗⑫ has a Journal Entry. From ⑬, head back to Shimizu Residence (1). |
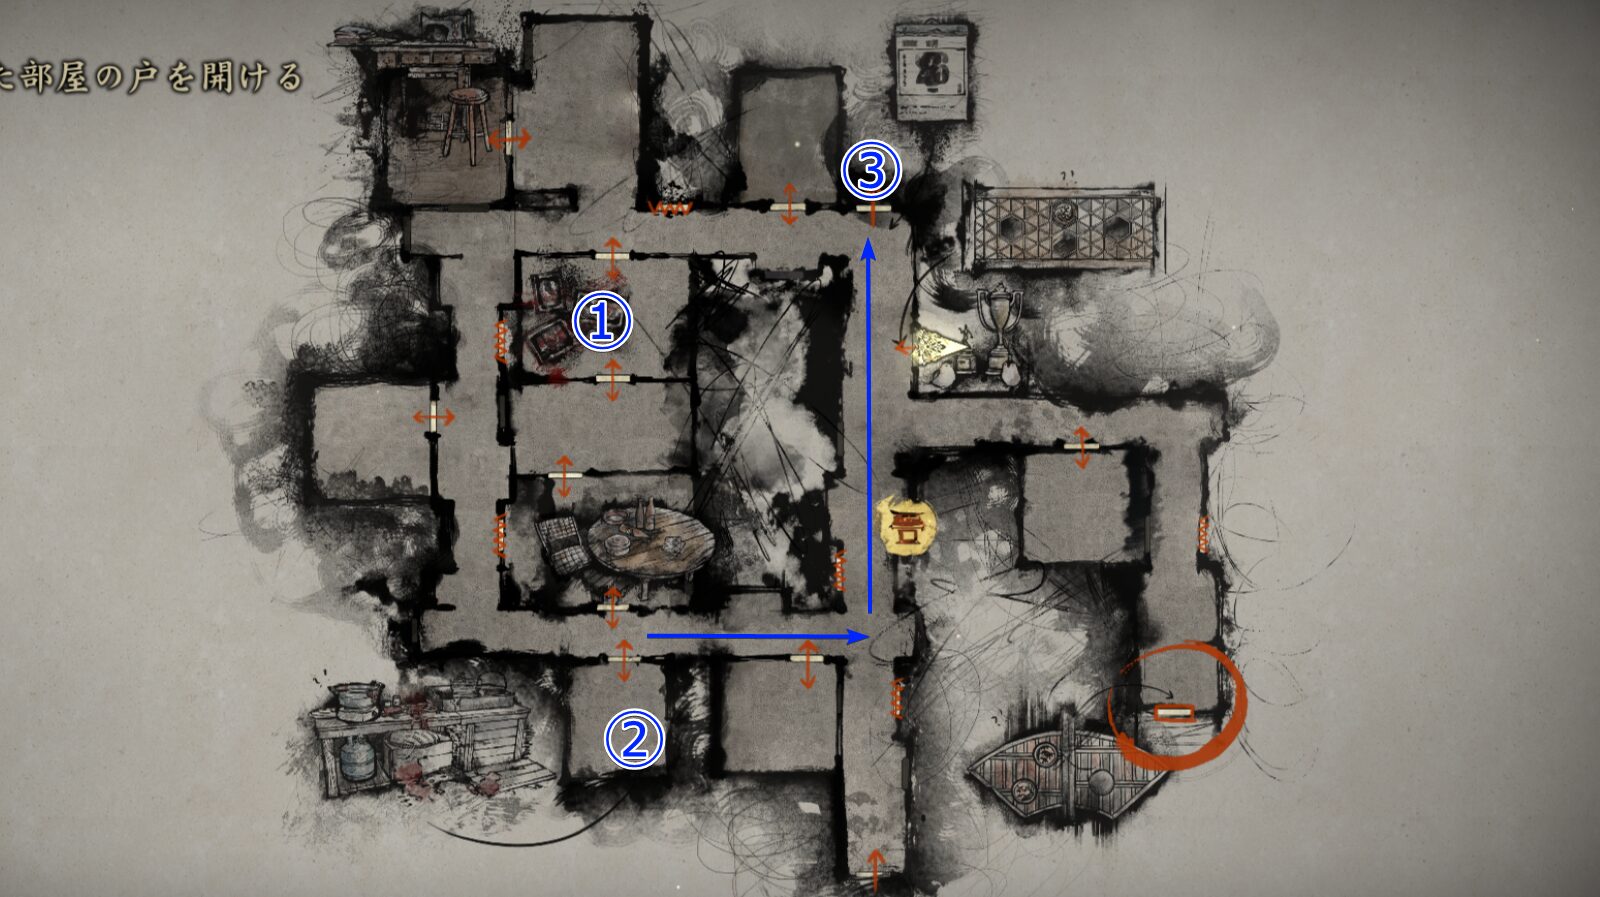 ┗① Solve the Puzzle [Ominous Photo] in this room. If you get it right, you’ll obtain the White Bird and Fox Plate. ┗② Connect the Propane Tube to the stove, place the Block of Wax on it, and obtain the Fletching Key. ┗③ From here, pass through Shimizu Residence (2) and proceed to the Shimizu Residence (3) map. |
| Things to Know |
| [Puzzle: Ominous Photo] If you look at the group photo, you can really feel how Hinako is being completely excluded by her parents, Shu, Sakuko, and Rinko. You can rotate each character’s picture frame upside down or right side up. Don’t forget to place the Picture Frame you picked up in the Shimizu Residence (2) map in its correct spot. Rotate the frames so that it forms a deliberately cruel composition where Hinako is the only one being singled out and you’ll solve the puzzle. It’s literally grade-school bullying energy. Set only Hinako’s frame facing downward. |
 ┗Follow the blue arrow and head toward ① where the wall has disappeared. Pick up the Omamori【Cuckoo】. ┗Use the Fletching Key to enter ②, then obtain the Black Bird and Sword Plate and some Yokan. ┗Return to Shimizu Residence (1) from ③. |
 ┗① Solve Puzzle [My Room] here. Once you get the correct answer, you can enter the room and pick up the Pine Tree Emblem. ┗② contains some Higashi. Head to the back of ③ to collect the items, then save at the Hokora. A Boss Fight [Husband and Wife] awaits further in. |
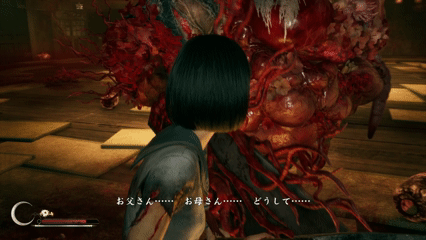
Boss Strategy: Husband and Wife
※For clarity, this guide applies unofficial labels to bosses whose official names have not been disclosed. These names are used solely for reference purposes.
Since an Achievement is tied to this fight, make sure to take down the Father first. Once he goes down, the battle will end.
Fight by Focusing on Counterattacks
Against the father, your main source of damage should be Counter.
Roughly 30% of his attacks can be countered, so the ideal strategy is to stay in front of him and provoke those moves. Make sure to maintain your Sanity as well.
Attacking freely outside of counters is difficult, as the mother is constantly waiting for an opening to strike and will disrupt any attempts you make.
Keep Both in Your Line of Sight
One tactic that worked well for me was positioning so that the mother is hidden behind the father.
By doing this, the father will block the knives she throws, and her melee attacks will hit him instead, causing her behavior to malfunction.
Of course, this method isn’t flawless, so you should still pay attention to her movements in the back.
Even if you can't keep her hidden, you can manage the fight as long as both are in your view. Still, there are moments where you’ll get hit anyway—it’s frustrating.
Notable Attack Patterns to Watch For
The real threat in this fight actually comes from the mother.
Not all of her attacks are lethal, but the ones below are especially likely to lead to a loss if mishandled.
① Knife Throw from Long Range
As mentioned earlier, if you position the father between you and the mother, the knife won't reach Hinako.
If not, you must avoid it. Getting hit can leave you stunned just long enough for the father to land a follow-up, turning a minor mistake into a disaster. The damage itself may be low, but the risk is not.
You can sidestep it at long range, but if she’s close, you must actively dodge or you will take the hit.
② Charging While Swinging Her Knife
When she starts this attack, run— even if it means distancing yourself from the father. She will pursue you for quite a while.
It’s a multi-hit attack, so if you run out of stamina mid-escape, you risk taking the entire combo and dying on the spot. Preserving stamina is crucial specifically to survive this move.
This is also why the strategy of countering the father almost exclusively is effective— it minimizes unnecessary stamina usage.
What About Her Other Moves?
Of course, her other attacks can still lead to a loss if you aren’t careful.
She also has grab attacks, but as long as you conserve your stamina, reacting and dodging them on sight is manageable.
So, compared to the two listed above, the rest are far less threatening.
| ←PREV Iwashimizu | NEXT→ Treasure Hall |
Related Guides
Here are my other SILENT HILL f guides. Feel free to check out anything that catches your eye.