This guide explains efficient ways to take down Shiromuku, key things to know, and its attack patterns.
Use this guide to assist you throughout your playthrough.
※For clarity, this guide applies unofficial labels to bosses whose official names have not been disclosed. These names are used solely for reference purposes.
Boss Strategy: Shiromuku
If You Can Manage Your Stamina, Go on the Offensive
Counterattacks are a valid option, but this boss has noticeable openings, so you don’t always need to wait for a perfect dodge to strike back.
However, make sure to conserve enough stamina for evasive actions—the boss’s attacks are powerful and often come in rapid chains.
Once you’re familiar with its moves, take advantage of dodge counters to maintain your stamina while dealing damage.
You Can Revive Multiple Times
You can revive twice in this fight (excluding the Lost in the Fog action difficulty).
After your first revival, you gain a buff that gradually restores HP over time.
Upon your second revival, you additionally gain a durability-infinite Steel Pipe, no Sanity / Stamina consumption, and unlimited full recovery using a Red Capsule. At this point, it’s basically Super Hinako Time—dodge freely, Focus as much as you want, and unleash your Focus Attacks nonstop.
Still, even Super Hinako can fall, so don’t get careless.
This encounter is practically a guaranteed victory once revivals kick in, but taking down the boss without reviving unlocks an Achievement. If you’re aiming for 100% completion, give it a try.
Attack Patterns
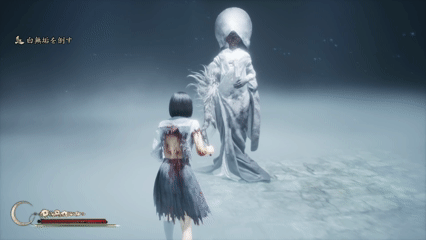
① Claw Attacks
There are several variations of this move, ranging from single strikes to lengthy combos.
Even if you circle behind her, her arms can still reach you. Keep her in your field of view and continue dodging until the attack fully ends.
You will also have chances to slip in counterattacks whenever openings appear.
The most recognizable version is when she slides sideways before clawing at you. Once you see this motion, it's the perfect time to Focus.
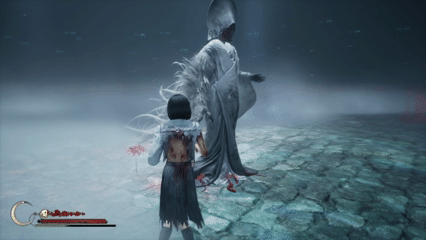
② Restraint Attack
She performs this when she crosses her arms into an X-shaped stance. It doesn’t deal much damage, but it drains your Sanity, so avoid it.
The attack is faster than it looks. Try dodging a bit earlier than you think.
③ Trap Floor Setup
She begins using this in Phase 2, after being knocked down for a long duration.
Stepping on the generated Red Tendril Zone immobilizes you and deals continuous damage.
Survey the area and move to a wide, open space. There’s no reason to remain in tight spots.
④ Wide-Area Explosion
This is an extremely high-damage attack used during the third phase, after you knock her down for the second time.
When she crouches in the center and starts some sort of ritual-like animation, that’s your cue to sprint all the way to the edge of the arena.
Even if there are tentacles along the way, you’ll have enough time to detour around them.
After the Fight
There isn’t much worth going into detail about here.
Unless you somehow fall asleep for ten seconds straight, there’s no real danger. Just treat it like an event cutscene and enjoy the moment.
Related Guides
Here are my other SILENT HILL f guides. Feel free to check out anything that catches your eye.